Here's What Actually Happens on the Day a Flat Roof Is Installed - Step by Step
Surprisingly, the most important part of a flat roof installation day often happens before a single roll of new material is ever opened. This is a realistic walk-through of the flat roof installation process - not the glossy version, but what actually unfolds hour by hour on a Queens rooftop.
Before the Rolls Open: What the Crew Checks First
At 6:45 in the morning, before anybody gets excited, I'm looking at the sky and the deck. Wind direction, overnight humidity, surface temperature - all of it matters before we touch a single material. Flat roof membranes behave differently depending on ambient conditions, and adhesives have no patience for a damp or cold substrate. Where moisture wants to sit is almost always the lowest point of a neglected deck, and where trapped air wants to push is under any membrane that goes down too fast over a surface that isn't ready.
Here's the blunt part: a flat roof is usually won or lost in the prep. I remember a humid July morning in Sunnyside, about 7:10 a.m., when a building owner kept asking why we weren't rolling membrane yet. I had to show him that the insulation boards were still holding surface moisture from overnight air - and if we rushed the flat roof installation process, we'd trap that under the system and pay for it later. People assume membrane goes down first, but first we stage materials away from heat sources, verify drain elevations, and walk every tear-off boundary. That sequence sets up everything else.
Pre-Installation Checks - Before Membrane Is Opened
-
1
Weather and Wind Check
Surface temperature, wind speed, and overnight humidity are assessed before any materials leave the pallet. -
2
Roof Access and Safety Setup
Ladders, hatches, and parapets are confirmed safe for crew movement and equipment positioning. -
3
Material Staging and Protection
Rolls and boards are positioned away from heat and potential moisture contact; membrane is kept flat and unkinked. -
4
Moisture Check on Existing Deck/Substrate
A non-destructive moisture meter reading confirms whether the deck surface is dry enough to accept adhesive or fasteners reliably. -
5
Drain and Slope Review
Drain elevations are compared to the field, and any low spots that will hold water after installation are flagged before work begins. -
6
Tear-Off Boundaries and Surface Protection
Adjacent surfaces, walls, and neighboring property lines are documented and protected before any demolition begins.
Quick Facts - What Usually Decides Whether Installation Starts on Time in Queens
Start Time
Often 6:30-7:30 a.m., especially in summer when heat builds quickly on dark decks.
Biggest Delay
Surface moisture - not laziness. A damp deck means a delayed start, full stop.
First Visible New Material
Often insulation board or cover board - not the membrane. That comes later than most expect.
Local Factor
Parapets, tight alley access, and neighboring properties slow staging in Queens significantly.
What Comes Off, What Gets Saved, and What Can Change the Plan
I've stood on enough Queens buildings to know that the first surprise is rarely the last one. I had a job in Jackson Heights just after sunrise in early March, with a retired couple watching from their kitchen window and bringing us too much coffee. We opened up the old roof and found three layers instead of the one listed in the paperwork - ballasted EPDM over modified bitumen over original built-up roofing. That changed the pace of the whole day and forced me to walk them through why proper tear-off comes before any flat roof installation instructions can mean anything. The deck underneath those three layers had moisture damage that only became visible once everything else was off.
The decision logic on what stays and what goes isn't arbitrary - I'm Elena Markovic, and I've spent 19 years installing and troubleshooting flat roofs across Queens, with a specialty in catching drainage mistakes before the roof is sealed, and the substrate question is always the same: can this layer accept fasteners at the required pull-out strength, and is it dry enough not to compromise adhesion? In older mixed-use buildings across Ridgewood and Astoria, you'll often find original wood plank decks with questionable fastening patterns, steel decks with rust pockets, and layers of previous repairs that were never fully removed. What the paperwork says and what's actually under your feet on the Roosevelt Avenue corridor can be two very different things.
| What We Find | Immediate Crew Response | Effect on Day's Pace | Reason It Matters |
|---|---|---|---|
| Wet insulation under old system | All saturated boards removed and set aside before deck inspection continues | Can add 1-3 hours depending on area | Trapped moisture under new system causes blistering and adhesion failure |
| More roof layers than reported | Full tear-off extended; owner notified and materials plan revised | Significant delay; may require additional dumpster or haul | New system must attach to clean, verified substrate - not layered, unknown materials |
| Rotted wood deck sections | Damaged sections marked, removed, and replaced with matching deck material | Moderate delay; size-dependent | Fasteners won't hold pull-out strength in compromised wood - roof will eventually lift |
| Drain bowls sitting high | Drain elevation measured and adjusted or shimmed before insulation is laid | Minor to moderate delay | A drain that sits higher than the field collects water instead of moving it |
| Rusted or open steel deck sections | Rust treated or deck panels replaced; structural check if deflection is visible | Can require structural consultation - possibly multi-day | Steel deck deflection creates low spots that concentrate water load over time |
Unexpected Conditions That Reset the Timeline
Extra Roof Layers Discovered
Wet Insulation Under the Old System
Damaged Wood or Steel Deck Sections
Drain Bowls Sitting Higher Than the Field
Where Water Is Supposed to Go Before Anything Gets Sealed
If you were standing beside me, the first thing I'd ask is: where do you think the water leaves? I ask that because most people look at a flat roof and see a surface - I look at it and see a drainage argument waiting to be settled. Where water wants to travel is physics, not opinion, and if the deck, drains, and scuppers aren't set up to win that argument before the membrane goes down, the membrane can't fix it afterward. This is why I think drainage review is the single most underappreciated step in the entire flat roof installation process - more critical than membrane brand, more critical than crew speed, and more often skipped than I'd like to admit. Heat tends to collect in low spots that hold water, and that combination accelerates membrane aging faster than almost anything else.
How the Crew Decides Whether Drainage Is Ready for Membrane Installation
Correct drain elevations and recheck before proceeding. No membrane goes down until water has a downhill path.
Remove and replace all saturated boards. Proceed only when substrate is dry and flat.
Repair or correct substrate deflection before insulation is laid. This step cannot be skipped.
Install tapered insulation layout before any flat cover board or membrane.
Proceed to fastening/adhesion stage. Drainage is confirmed ready.
| Myth | Fact |
|---|---|
| "Flat means level" | A properly installed flat roof has deliberate slope - usually ¼" per foot minimum - built into the insulation or deck to direct water toward exit points. Level is a drainage problem. |
| "Ponding can be fixed later without consequence" | Standing water within 48 hours of a storm accelerates membrane degradation, adds structural load, and signals a drainage failure that doesn't self-correct. It has to be addressed at the insulation layer, not after sealing. |
| "If the membrane looks smooth, drainage is fine" | A smooth membrane surface is no indicator of proper slope. Low spots can exist invisibly until rain reveals them. Drainage is confirmed by elevation checks during installation, not by eye afterward. |
| "Drains are a finishing detail" | Drain positions, bowl elevations, and surrounding flashing are determined before membrane ever goes down. Setting a drain correctly is among the first structural decisions of the day, not the last. |
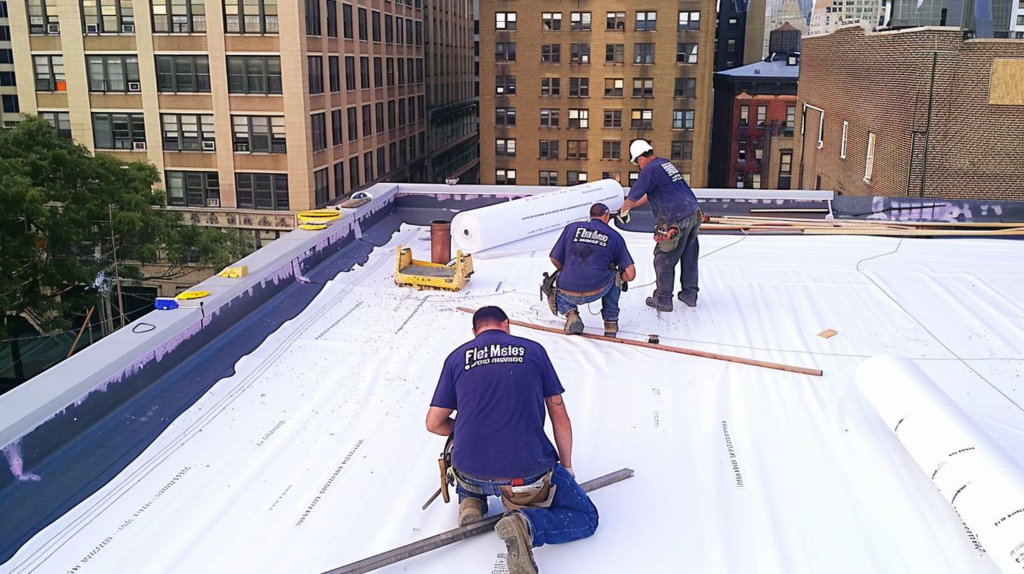
Then the New System Starts to Take Shape
Insulation, Cover Board, and Membrane Order
Two rolls of membrane can look perfect on the pallet and still fail on a sloppy roof. That sounds logical, but on a roof, the membrane is actually the last meaningful layer in a sequence that begins with fastened or adhered insulation board, then a cover board to protect the insulation and give the membrane a stable, consistent substrate. Insulation thickness, fastener pattern, and board offset all get set before anyone unfurls the first roll. The adhesion method - whether fully adhered, mechanically fastened, or ballasted - drives the entire sequence, and the crew that skips the cover board to save time is the one you'll be calling back after the first winter.
Edge and Penetration Details
One windy October afternoon in Maspeth, I was finishing edge detail checks on a small mixed-use building when I noticed a parapet cap crew from another trade had dropped metal shavings all across our work area. I stopped the installation, had everything cleaned, and found two tiny puncture points waiting to happen. That's the kind of detail customers never see on installation day - and honestly, the cleanest-looking roof can still hide real trouble at seams, corners, and transitions. Debris that gets sealed under edge metal or flashing doesn't announce itself until it's already a leak. Cleanup before detail work matters far more than most people expect, and it's not a courtesy - it's a technical step.
Before calling the membrane field complete, the crew runs seam checks across every lap, probes adhesion edges where applicable, and confirms that moving air can't find a perimeter gap to lift against. Heat wants to build at the membrane surface and expand whatever's beneath it, and where air tries to lift is almost always at an unsecured perimeter or an insufficiently fastened termination bar. Debris removal from the field finishes the check - nothing small and hard should stay trapped near a seam. This stage takes longer than it looks, and a crew that rushes it is gambling on the first hard rain.
Visible Milestones You May Notice During the Day
- ✔Tear-off complete - Old roof layers fully removed and loaded for haul.
- ✔Deck exposed - Substrate visible, moisture-checked, and damage-mapped before anything goes back down.
- ✔Damaged areas replaced - Rotted or deflected deck sections repaired with matching material and confirmed flat.
- ✔Insulation layout set - Boards fastened per pattern with any taper installed for drainage direction.
- ✔Cover board down - Stable, consistent substrate confirmed before the first roll of membrane is opened.
- ✔Membrane field installed - Seam laps, adhesion or fastening, and field coverage completed and checked.
- ✔Edges, details, and cleanup sealed - Penetrations, corners, terminations, and drain flashings finished. Debris cleared from the field.
⚠ Why "It Looked Finished by Lunch" Can Be Misleading
Visual completion doesn't mean the job is done. Detail work, seam verification, edge securement, adhesion cure time, and drainage confirmation all happen after the membrane field looks finished - and skipping or rushing any one of them creates leaks that don't show up until the first hard rain. A roof that looks sealed at noon may still have open transitions, uncured seams, and unsecured terminations that will let water in by October. Don't sign off on the day based on what you can see from the street.
After the Crew Packs Up: What You Should Confirm Before Calling It Done
A roof deck behaves a lot like a lab table - if the surface is off, every result after that is unreliable. Before the crew leaves and you accept the day's work, there are six things worth asking about directly: what wet materials were removed, whether drains are clear and photographed, what deck repairs were made, what insulation and cover board was installed, whether seams and penetrations were verified before cleanup, and what weather conditions or cure time apply for the next 24-48 hours. Not demanding - just asking. A crew that's done the work right will have answers ready. Those six questions also give you a paper trail worth keeping if anything needs to be revisited.
Before You Call It Done - Questions to Verify After Installation Day in Queens
-
1
Were all wet materials removed - insulation, substrate layers, anything that read moisture on a meter? -
2
Were drains and scuppers left clear, and were their final positions photographed before membrane went down? -
3
What deck repairs were made, and where? Ask for specifics, not a general answer. -
4
What insulation type and thickness was installed, and was a cover board included? -
5
Were seams, edges, and penetrations checked and verified before final cleanup - not after? -
6
What weather restrictions or cure-time notes apply for the next 24-48 hours after today's work?
Common Questions About the Day-Of Installation Process
Why didn't the crew start rolling membrane immediately?
Can installation continue if the roof surface feels only slightly damp?
Is one day enough for every flat roof project?
What should I ask for before the contractor leaves?
The flat roof installation process is mostly decided before the surface looks finished - deck condition, drainage, and detail work set the outcome long before the job looks done from the ground. If you want a crew that walks you through each stage clearly instead of rushing the day, contact Flat Masters to schedule a flat roof installation walkthrough and estimate in Queens.
