That Leak Near the Edge or Parapet Is Almost Always the Flashing - Here's Why
Why the stain fools people before the roof does
Do you remember when you saw that water stain spreading across the ceiling and your first instinct was to picture a hole somewhere in the middle of the roof? That's the wrong answer - and it's the most common one. Think of a flat roof like a winter coat: the broad fabric across the back might be perfectly intact, but if the collar, cuffs, zipper, or hem are open at the seam, the cold gets in fast. The membrane in the field of a flat roof is almost never where the failure starts. It's the edges, the transitions, the terminations - that's where weather enters first.
If I asked you where water enters, what would you point to? Most people gesture somewhere vaguely above the stain, which is understandable - the stain is the only evidence they can see. But water doesn't always fall straight down through a roof. It enters at a gap, then travels sideways through saturated insulation, runs along a deck slope, drops into a wall cavity, and shows up on your ceiling a full room away from the real entry point. That's why chasing the stain directly rarely leads you to the actual flat roof flashing leak.
| Myth | Real Answer |
|---|---|
| The interior stain marks the exact spot where water entered the roof. | Water travels laterally through insulation and wall cavities. The stain can appear 10-15 feet from the real entry point - especially on Queens flat roofs where parapet heights and deck slopes direct water inward. |
| The center field membrane is always the weak spot on a flat roof. | Field membrane is a single continuous surface. Flashing details at edges, parapets, and wall tie-ins involve seams, fasteners, and movement joints - all of which degrade faster under Queens freeze-thaw cycles. |
| Applying more coating near the interior stain will stop the leak. | Coating the field near the stain treats the wrong location entirely. If failed flashing at the parapet is the real source, surface coating doesn't reach it - and the leak returns with the next storm. |
| Parapet leaks only happen on very old roofs. | Parapet flashing fails on roofs of all ages. Wind-driven rain, thermal movement, and poor original installation can crack or separate edge details within a few years on newer systems too. |
| Flashing problems are obvious and easy to spot from street level. | Most flashing failures - split base flashing, lifted termination bars, failed counterflashing - are invisible from the ground. They're found by hands-on inspection at the parapet wall, corner transitions, and sign-frame tie-ins. |
Tracing the leak path at parapets, corners, and wall tie-ins
Where water gets in versus where it shows up
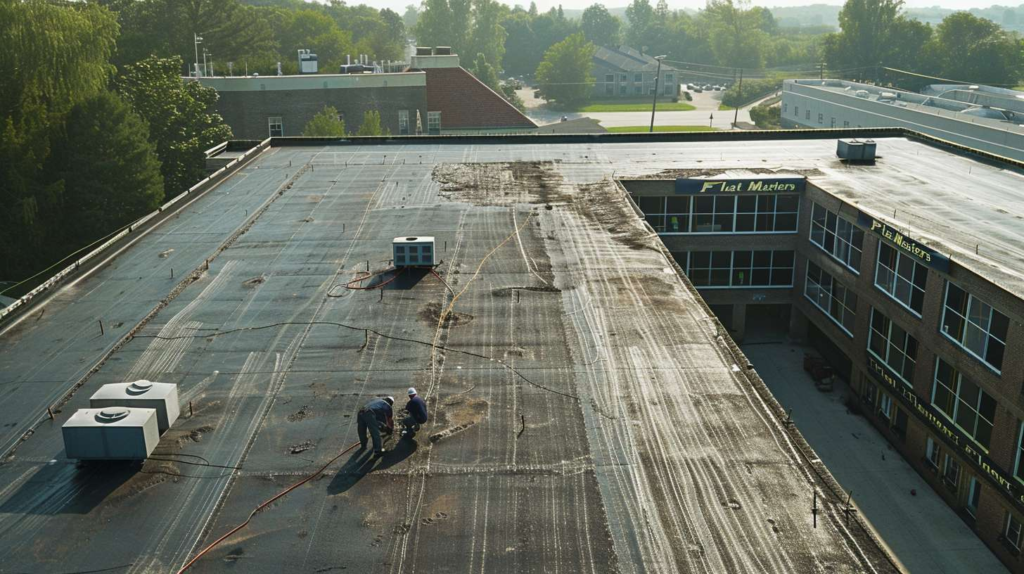
At the parapet, I slow down first. Before I look at anything else - drains, field seams, penetrations - I'm crouching at every parapet corner, pressing on termination bars, checking coping edges, and looking behind any sign frame or rooftop equipment that interrupts the wall plane. I'm Marisol Vega, and with 19 years of flat roofing experience and a specialty in diagnosing recurring parapet and edge leaks, I can tell you that inspecting wall transitions before the field membrane isn't a preference - it's the logical sequence. The failure rate at these transition points is dramatically higher than at an intact mid-roof membrane, and in my experience, nine times out of ten the real entry point is somewhere along that parapet line.
I remember one roof on 37th Avenue where the owner met me at 7:10 in the morning after an all-night April rain, still in his jacket, pointing at a ceiling stain in the top-floor hallway like the field membrane had personally let him down. I didn't say much. I walked straight to the closest parapet corner, found a termination area that lifted with almost no effort, and underneath it - damp insulation and a clean split in the base flashing that someone had buried under a thick smear of roof cement. The water wasn't coming through the field at all. It had entered at that parapet corner and traveled sideways through the insulation for a full twelve feet before it showed up on his ceiling. He got very quiet when I showed him the water track. That's usually when it clicks.
Queens makes this problem worse in specific ways. The borough's older building stock - attached rows, multi-family walk-ups, mixed-use buildings with masonry parapets - was often built with parapet details that rely heavily on sealant and surface-applied flashing that doesn't handle movement well. Freeze-thaw cycles every winter cause masonry to expand and contract, and that movement slowly separates base flashing from the wall. Add the wind exposure along avenues like Northern Boulevard or Jamaica Avenue, and you have wind-driven rain hitting parapet faces hard from the side, not just from above. Then factor in the neighborhood reality that most of these roofs have seen a patch-over-patch repair history for decades. All of that adds up to flashing-specific leaks being the norm, not the exception, on Queens flat roofs.
| Flashing Detail | What Fails First | What You May Notice Inside | Why the Stain Appears Away from Entry |
|---|---|---|---|
| Parapet corner split | Base flashing separates at 90° corner due to thermal movement | Stain on upper wall or ceiling near corner of top-floor room | Water enters corner, runs along deck angle, exits at low point far from parapet |
| Loose termination bar | Fasteners back out of masonry, bar lifts away from wall | Dripping or wet wall directly below termination height | Water entering behind the bar wicks into wall cavity before reaching interior surface |
| Failed counterflashing | Metal cap pulls away from reglet or sealant cracks open | Window head or wall leak that worsens during wind-driven rain | Wind pushes water behind cap; it tracks down wall cavity and exits at window frame or floor joist level |
| Cracked sealant at wall transition | Sealant hardens and shrinks away from masonry face | Intermittent damp smell or soft drywall near top-floor wall | Thin water film enters crack slowly, saturates insulation over time before visible staining |
| Brittle tie-in behind sign frame | Heat exposure behind metal frame bakes flashing material until it cracks and pulls back | Leak appearing in area unrelated to visible roof surface condition | Entry point is hidden behind frame; water runs under flashing and exits at nearest structural gap |
| Coping-related opening | Coping joint separates or cap shifts, exposing top of parapet wall | Water stain running down interior face of parapet wall or top-floor ceiling edge | Water saturates full parapet wall thickness before migrating inward to ceiling plane |
What repeat repairs usually miss on a flashing-specific leak
Here's the blunt version: when a flat roof flashing leak keeps coming back after coating, patching, and roof-cementing, it's almost never because the contractor didn't apply enough material. It's because the actual failure - a split in the base flashing, a loose termination, a pulled-back edge detail - was covered over instead of corrected. In my firm opinion, smearing roof cement over a flashing detail is one of the most common ways to delay a real repair while making the eventual diagnosis significantly harder. It looks like something was done. And something was done - the evidence was buried.
A leak at the edge is often a detail failure pretending to be a roof-wide problem.
⚠ Warning: How repeated patching can make a flat roof flashing leak harder to diagnose
- Burying a split base flashing under roof cement hides the failure point without restoring the bond. The next rain cycle re-opens the split beneath the cement layer - but now it's invisible and harder to locate.
- Trapping moisture under a patch accelerates insulation saturation and can cause blistering or membrane delamination in areas that were previously undamaged.
- Fastening through a compromised edge detail to hold it down creates new puncture points without addressing why the detail lifted in the first place - often thermal movement or a failed original installation.
- A dry field membrane does not mean the roof isn't leaking. If the entry point is at the parapet and the field looks fine on a visual scan, a contractor who only inspects the field will clear the roof - and the leak will return.
| Approach | Pros | Cons |
|---|---|---|
| Surface patching & coating only |
|
|
| Proper flashing repair at the detail |
|
|
How to tell whether your edge detail needs urgent repair or a planned fix
Simple clues before you call
Three inches of bad detail can beat thirty feet of good membrane. That's not an exaggeration - a tiny separation at a parapet corner or a lifted termination bar can let in more water during a single nor'easter than a broad mid-roof blister ever would. The membrane in the field of a flat roof is designed for exposure; flashing details at edges and walls are designed for transitions, and those transitions involve fasteners, sealants, and layered materials that move independently of each other. When one layer pulls away from another - even a little - wind-driven rain finds it immediately.
It's like buttoning your coat and leaving the collar open. In Ridgewood, I worked with a retired couple who had hired three separate contractors before they called Flat Masters, and all three had applied more coating to the field surface. The minute I saw the metal counterflashing rattling against the parapet wall - I could hear it before I even reached the corner - I knew exactly what had been driving that bedroom window head leak every time a storm came from the northeast. I tapped the metal with my knuckle and told them, "This roof is wearing a good coat with the zipper open." Here's the insider tip worth writing down: if your leak appears during storms from one specific direction but not during straight-down heavy rain, you're almost certainly dealing with a loose counterflashing or a coping-related opening that wind is exploiting. Track the storm direction. That single detail tells a good inspector more than a week of interior stain observation.
🔴 Call Now - Urgent
- Active dripping along a wall line or at the ceiling edge
- Bubbling or blistering at the parapet base after rain
- Loose metal counterflashing or coping flapping in wind
- Leak near an electrical conduit run or panel at the roof edge
- Mold or saturated insulation odor following a storm
🟠 Can Be Scheduled Soon
- Old sealant showing surface cracks but no active moisture
- Cosmetic ceiling stain from a historic issue confirmed dry
- Minor surface rust on stable metal flashing with no lift
- Single damp spot after one isolated heavy storm, now dry and not repeating
🕐 Should you suspect flashing first?
✓ YES
Suspect flashing and edge detail inspection first. Don't coat the field membrane until the parapet, terminations, and corner tie-ins have been ruled out.
✕ NO
Check field membrane, drains, and mid-roof penetrations next. Blisters, open seams, and clogged drains are the more likely suspects.
Second check: Does the leak worsen with wind from one direction?
Questions Queens owners ask after the same leak keeps coming back
I got called to a small mixed-use building near Astoria Boulevard right before sunset one August evening, and the deli tenant was furious - water was dripping near the back prep area even though the center of the roof looked completely fine. What had actually happened was a deteriorated tie-in at the edge flashing near the parapet, directly behind an old sign frame where heat had baked the material brittle and pulled it away just enough to let water in during rain. I had to explain it three times - in English and in Spanish, to three different family members at once - that the leak wasn't random. It was behaving exactly like edge flashing failures behave: invisible from the ground, hidden behind equipment, and easy to miss if you only scan the field. The leak had a logic to it. Once you understand that logic, you stop being surprised by it.
⚡ Fast Takeaways - Flashing-Specific Leaks on Flat Roofs
Most Common Suspect Area
Parapet and edge transition - not the field membrane
Misleading Symptom
Interior stain appears away from the actual water entry point
Storm Clue
Wind direction matters - leak worsening from one storm direction points to edge or counterflashing failure
Best Next Step
Targeted flashing inspection at the parapet and edge details before applying any broad coating
If a leak near a wall, parapet, or roof edge keeps showing up on your Queens property despite repeated repairs, the detail - not the field - is almost certainly where the answer is. Call Flat Masters and we'll do a targeted flashing inspection that starts exactly where the problem usually lives: at the transition, the termination, and the edge.
