How Is a Flat Roof Actually Built? Here's the Complete Build Process Explained
Short-term thinking and long-term thinking produce different results. Most flat roof failures don't start with the membrane-they start with what was built underneath it and in what order. This is a full, plain-English walkthrough of the complete flat roof construction process, from the deck up through drainage details, written for Queens property owners who want to know what's actually happening up there.
Why Build Order Decides Whether the Roof Lasts
At the drain, that's where I look first. Not the field membrane, not the flashings around the HVAC curbs-the drain. Because in flat roof construction, failure almost never announces itself at the top. It starts below, usually where a rushed taper meets a drain that was installed as an afterthought, or where a layer of insulation got covered before anyone checked if it was dry. The membrane is the last layer to go wrong and the first thing everyone blames.
Here's my honest opinion, and I've said it standing on more Queens rooftops than I can count: too many owners ask the wrong first question. They want to know if it's TPO or modified bitumen, which brand, what the warranty wording says. That stuff matters-but only if everything underneath it was assembled correctly. Think of the whole build like a late-night grill station. Deck first. Slope set up next. Then insulation, cover board, membrane, flashing, edges, and drainage details-in that order, every time. If one station sends the wrong thing down the line, everything after it is compromised. You don't fix a bad deck by putting a premium membrane on top of it, the same way you don't fix cold fries by adding better cheese.
| Build Order | Layer / Component | What It Does | What Happens If It's Done Wrong |
|---|---|---|---|
| 1 | Structural Deck | Bears all load; provides the base plane for every layer above | Soft spots and rot compress insulation, break seams, and void warranties |
| 2 | Vapor Retarder (where required) | Controls moisture migration from the building interior into the assembly | Trapped interior moisture condensates inside insulation, causing mold and R-value loss |
| 3 | Tapered Insulation | Creates slope (minimum ¼" per foot) to move water toward drains | Zero slope means ponding, membrane degradation, and structural load from standing water |
| 4 | Additional Insulation Layers | Builds up R-value; joints staggered to eliminate thermal bridging | Aligned joints create weak lines; wet insulation layers destroy thermal performance |
| 5 | Cover Board | Provides compressive strength, smooth substrate, and fire resistance beneath the membrane | Membrane applied directly to soft insulation will telegraph imperfections and fail at seams |
| 6 | Membrane System | Primary waterproofing layer; attached, adhered, or ballasted per design | Even a quality membrane fails fast if the substrate moves, traps moisture, or has poor slope |
| 7 | Flashings, Edge Metal & Drainage Terminations | Seals all transitions, walls, penetrations, and perimeter edges; completes the drainage path | Installed as an afterthought instead of integrated into layers, every transition becomes a leak point |
| Myth | Real Answer |
|---|---|
| "The membrane failed, so that's the problem." | The membrane is usually the last thing to fail. Check what's under it before you replace it. |
| "Flat means level-that's the whole point." | A flat roof must have engineered slope. Water has to go somewhere; a truly level surface just collects it. |
| "We can lay new material right over the old layers." | Covering wet insulation traps moisture permanently. The new roof is already compromised before it's finished. |
| "Adding drains will fix the ponding problem." | Drains don't create slope. Without proper taper, water still won't reach the drain-it just has somewhere to go if it gets there on its own. |
| "Flashing is a finishing detail, done last." | Flashing is a system detail, integrated into each layer as it's installed. Doing it last is how you get water behind it. |
Underneath the Surface: Deck, Slope, Insulation, and Cover Board
What the Structural Deck Has to Be Before Anything Else Happens
Bluntly, a flat roof is never really flat. But before we even get to slope design, someone has to be honest about the deck. I'm Marco Velez, and I've been doing flat roof construction in Queens, NY for 17 years with a specialty in correcting bad build sequences-and when I step onto a roof for the first time, I'm not thinking about what membrane goes on top; I'm pressing my foot against the deck surface, looking at fastener pull-through, checking for soft spots, bouncy sections, and any sign of moisture damage in the substrate. You cannot build good layers on a bad structure. Period. A deck that flexes, holds moisture, or has compromised fastening integrity will destroy every layer above it, no matter what brand you put on top.
How Taper Creates Water Movement Instead of Ponding
Here's the part people always want to skip: the slope. Tapered insulation isn't a luxury upgrade-it's the drainage plan. You design the slope first, map where the drains or scuppers sit, then engineer the taper layout to move water toward those exits. Skip this step, and you're basically building a tray. Queens rooftops have specific challenges here that you won't read about in a generic roofing guide. Rear-drain layouts are common on the row-style buildings and mixed-use walk-ups in Astoria, Ridgewood, Sunnyside, and Long Island City, which means taper often has to work across a longer roof plane with less pitch to work with. Pair that with freeze-thaw cycles, heavy wind off the East River corridor, and tight mechanical spacing from HVAC equipment that was bolted down without much thought for drainage-and slope planning becomes the most important conversation before any material gets ordered.
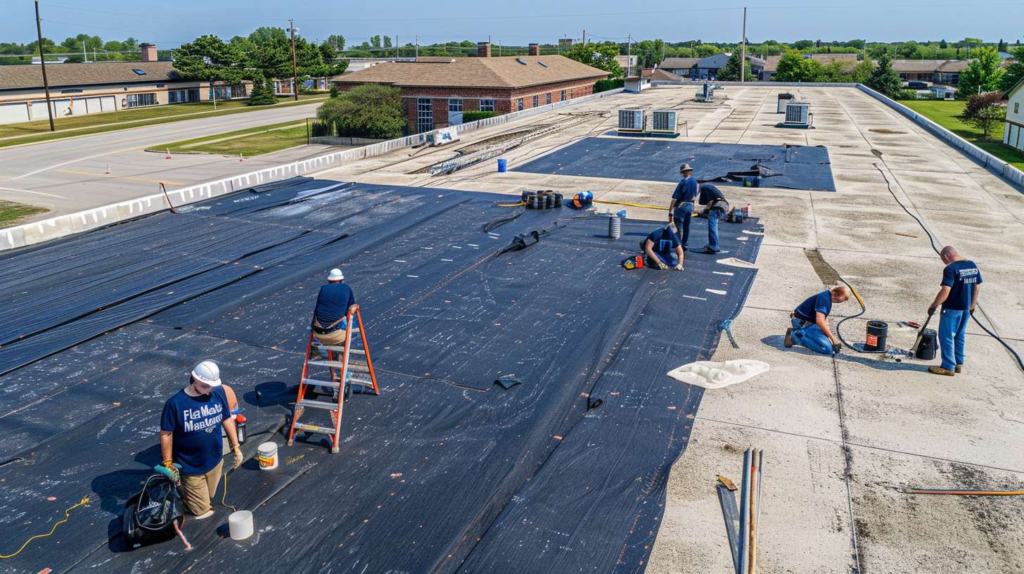
Once the taper layout is confirmed, insulation goes down in staggered layers with joints offset so there's no continuous seam running straight across the roof. Compressive strength matters here more than people realize: insulation that compresses under foot traffic or equipment load will cause the membrane above it to wrinkle, bridge, and eventually split at seams. The cover board-typically high-density polyiso, gypsum fiber board, or a similar rigid panel-goes on last before the membrane, and its job is to give you a firm, smooth, stable surface that the membrane can actually bond to. Fasteners or adhesive patterns have to be right; missed spots create billowing, and billowing creates stress at every seam.
Check for rot, soft spots, compromised fasteners, and moisture saturation. Any damaged sections are repaired or replaced before anything else happens. This step cannot be skipped to save time.
Old insulation, patch layers, and wet substrates come off the roof entirely. Covering compromised material is the single most common reason a new flat roof fails within its first few years.
Locate all drain points, scuppers, and overflow outlets. Design the taper layout so every area of the roof has a clear, downhill water path. This is drawn out before a single panel of insulation is ordered.
Tapered panels go down according to the engineered layout. Start from the high points and work toward drains. Joints are staggered to prevent thermal bridging and continuous weak seams.
Mechanical fasteners or adhesive are applied per the specified pattern for that roof's wind zone. In Queens, wind uplift requirements are serious-edge and corner zones need denser fastening than field areas.
The cover board is secured on top of insulation with staggered joints. All transitions-at walls, curbs, and drains-are checked for flatness and compatibility with the membrane system. This is the last step before waterproofing begins.
Installing membrane over wet insulation, soft spots, or poorly tapered substrate doesn't fix those problems-it buries them. Trapped moisture will continue to degrade the assembly from the inside, and you won't see the damage until the roof is already failing from within.
A roof can look completely finished and still be built wrong. The surface will appear clean and tight for months-sometimes a full season-before the bubbling, seam stress, and ponding make the truth obvious. By then, you're looking at a tear-off, not a repair.
Then Comes the Weatherproofing Layer-But Not by Itself
I learned this on a bakery roof before sunrise. It was a July morning in Astoria, around 6:10 a.m., already sticky outside, and the bakery owner was on the ladder with me before we even rolled the membrane out. The old roof looked fine from the street. But once we opened the section near the rear drain, the insulation was layered like wet cardboard-three different repairs piled over ten years, each one applied without removing the compromised material underneath. That was the job where I stopped talking about membranes entirely and started showing him, layer by layer, why flat roof construction is mostly about sequence. The membrane was the least interesting part of that problem. What actually decided whether that roof would last was whether the edges were integrated properly, whether the penetrations were set before or after the field membrane, and whether the drain terminations were done as part of the assembly or bolted on at the end.
Where Queens Roofs Usually Go Sideways
Drain Paths, Ponding Zones, and Parapet Trouble Spots
If you were standing next to me on the ladder, I'd ask you one thing: where is the water supposed to go? Not where the drain is-where is the water actually going to travel to get there? One February afternoon in Ridgewood, sleet coming sideways, I got called to a two-family where the owner was convinced the brand-new roof was failing. It wasn't the membrane. The construction of that flat roof had skipped proper taper, so meltwater just sat there like a bad decision. I used a push broom in the slop to physically show the water path, because sometimes a customer needs to see physics, not hear a speech. Sounds logical that a new roof would drain correctly, right? That's where people get burned-they assume because it's new, the slope is there. It might not be.
Think of it like building a sandwich you have to stand on for 20 years. Every component has a job, and none of them are optional. Drains, scuppers, parapet flashing, and curb transitions cannot be treated as add-ons that get figured out after the field membrane is down. And here's the insider read on Queens rooftops specifically: the first clue of bad construction is almost never in the big open field of the roof. It's at the line where the wall flashing, the edge metal, and the roof plane meet. That's where sloppy sequencing shows up first-where a parapet cap wasn't integrated with the base flashing, or where a scupper was cut after the membrane went on instead of before. The Northern Boulevard-style mixed-use buildings from Astoria down through Jackson Heights are full of roofs where that transition was treated as someone else's problem.
If water lands on your roof right now, can you point to its exact exit route without guessing?
Read This Sequence Before Anyone Tells You the Roof Is 'Done'
Here's the part people always want to skip-and I mean the part at the end, not the beginning. Final verification. I was on a Sunnyside job at dusk, maybe 8:30 p.m. in late spring, when a GC pushed hard to stack steps out of order to save half a day. We had HVAC curb work pending, new cover board down, and two young guys on the crew watching the argument like it was a boxing match on Atlantic Avenue. I told him no, flatly, because constructing flat roof systems out of sequence is how you create leaks that don't surface until the first humid week in August-silent, invisible, catastrophic by the time anyone notices. That roof stayed dry. The building next door called me three months later for an emergency patch because someone else said yes to the shortcut. The punch-list on a flat roof isn't paperwork-it's the final pass on seam integrity, termination details at every drain, edge securement confirmation, curb flashing verification, and a documented walkthrough of the drainage path so the next person on that roof knows exactly what was done and where.
If the order is wrong, the roof may look finished and still fail inside its first two winters. If the order is right-deck clean, slope designed, insulation dry and secured, cover board solid, membrane attached correctly with integrated flashings-then the membrane gets a fair shot to last its full service life. That's the whole point of flat roof construction done properly.
If the sequence was right, the roof has a real shot at lasting-if it wasn't, you'll find out when you least want to. If you want Flat Masters to take a look at how a roof was assembled, walk the layers with you, and tell you straight whether the build was done correctly, give us a call.
