Building Trusses for a Flat Roof - Here's What the Structural Work Really Involves

Building Trusses for a Flat Roof – Here’s What the Structural Work Really Involves

Building Trusses for a Flat Roof - Here's What the Structural Work Really Involves

Noticing early is valuable - it keeps the fix proportionate. Flat roof truss construction isn't about making a surface look level; it's about engineering a controlled path for load, drainage slope, and structural movement before a single layer of insulation, membrane, or rooftop equipment locks every mistake permanently into place. Get that sequence wrong, and no roofing crew on earth fixes it from the top down.

Why "flat" framing fails when the load path is guessed

Noticing early is valuable - it keeps the fix proportionate. And the way I diagnose flat roof framing is almost exactly how I used to catch mistakes in a student's geometry proof: you follow the load's intended path, step by step, until the logic breaks. That break - wherever the numbers stop adding up - is where the structure is already in trouble. Flat roof truss work is not about creating a flat surface. It's about deciding, before roofing materials arrive, where load travels, how water finds its way off, and what controls movement when temperature and weight are both pushing the frame in different directions.

Residential building with professionally installed flat roof trusses supporting a modern, clean roofline.

On a Queens rowhouse span of 18 feet, I already know where I'm looking first. And honestly, when someone hands me a plan and describes a flat roof addition as "simple," I take that as a signal that the hard structural questions got skipped, not answered. Calling it simple is usually a shortcut around a conversation nobody wanted to have. I remember standing on a two-family in Ridgewood at 6:40 in the morning, coffee balanced on an upside-down bucket, while a homeowner told me his new addition roof looked fine "except after rain." The issue was a badly planned building flat roof truss layout that left one section carrying more load than the rest - and you could see the ceiling line dipping by the window header from inside the room. That's where Marisol Vega, with 19 years of flat roofing experience, is often called in: when flat roof framing looks almost right but already shows sagging lines and interior crack patterns that trace straight back to a load path nobody mapped before the lumber went up.

Myth vs. Fact: Flat Roof Truss Construction

Common assumptions that cost Queens homeowners real money

Myth Real Answer
Flat means no slope is needed. Every flat roof requires a minimum ¼" per foot drainage pitch built into the framing. Without it, water ponds, adds live load, and accelerates membrane failure - no matter how good the waterproofing material is.
Trusses just need to span the width. Span is only one input. Bearing point location, point loads from parapet walls and equipment, and deflection limits under combined loads all drive truss geometry. Spanning the width without addressing those variables is guesswork.
The roofing crew can solve framing mistakes later. Once insulation and membrane are installed, structural deflection and drainage failures become invisible and exponentially more expensive to correct. Framing errors don't shrink - they compound under load and weather cycles.
If it passed a visual inspection, it's carrying weight correctly. Deflection under load is often invisible until rooftop equipment, snow, or ponding water adds the full design load. A truss that looks solid at framing stage can still be undersized for real-world combined loads.
Mechanical runs can be worked around after framing. HVAC ducts, conduit, and drain lines compete directly with truss depth and bearing zones. Coordinating those routes after trusses are set almost always forces field cuts or altered spacing - both of which undermine the engineered load path.

Quick Facts: What Structural Work Really Includes Before Flat Roofing Starts

Primary Concern

Load path - every pound needs a verified route to a bearing point before lumber is cut.

Hidden Requirement

Built-in drainage pitch - slope must be engineered into framing, not compensated for by tapered insulation alone.

Coordination Issue

HVAC, duct, and beam conflicts must be resolved in the plan - not improvised after trusses are installed.

Most Expensive Mistake

Discovering deflection after roofing layers are already installed - at that point, correction costs multiply fast.

Mapping the structural work before anyone cuts lumber

Span, bearing, and support points

Here's the part people don't enjoy hearing. A proper plan starts with span, bearing walls, point loads, openings, and - critically - where the weight has somewhere real to go, not just somewhere it looks like it goes on a sketch. In Queens, that conversation gets complicated fast. Rowhouse rear additions run into existing masonry walls that may or may not be continuous to the foundation. Narrow lots mean duct runs, parapet edges, and new framing all compete for the same eighteen inches of horizontal space. Mixed conditions - old brick bearing walls paired with newer wood framing - create handoff points where the load path has to be verified, not assumed. The plan has to name every one of those variables before a single piece of lumber gets priced.

I once watched a perfectly decent carpenter get fooled by a "flat" drawing. It was a cold March drizzle in Woodside, a rear extension for a retired piano tuner who kept apologizing for asking too many questions - though his questions were better than most. The crew's approach to how to build flat roof trusses had no clean route for drainage taper, ductwork, and load distribution to coexist in the available depth. The drawing showed it flat, so they planned it flat. The piano tuner went downstairs during our review and came back with a ruler from his piano bench to help me mark the conflict zones on the plan, and I genuinely think that's the most Queens thing that's ever happened to me on a framing consult. We rerouted. The crew wasn't happy that afternoon. They were glad later.

That sounds reasonable until the weight has somewhere real to go.

Structural Planning Sequence: How to Build Flat Roof Trusses Correctly

1

Confirm span and bearing points

Measure actual span, locate bearing walls, and verify that support points are structural - not just where someone assumed a wall was load-bearing.

2

Identify all load categories

Account for dead load (roofing assembly weight), live load (occupancy and maintenance), snow and rain accumulation load, and any rooftop equipment - HVAC units, water tanks, solar - that adds point loads.

3

Set drainage strategy and slope direction

Determine slope direction, minimum pitch (¼" per foot minimum), drain or scupper locations, and where water exits the parapet before the truss geometry is finalized - not after.

4

Coordinate openings, skylights, ducts, and parapets

Map every penetration and obstruction. Skylights and duct chases require header framing and altered truss spacing - those conflicts must be resolved on paper, not improvised on the deck.

5

Choose truss geometry and spacing from engineered requirements

Truss depth, top chord slope, bottom chord configuration, and spacing (typically 16" or 24" o.c.) must come from load and deflection calculations - not from what the lumber yard had available that week.

6

Verify bracing, connections, and sheathing interaction before roofing begins

Lateral bracing, truss-to-plate connections, and sheathing attachment patterns complete the structural system. Skipping this review before roofing starts means the finish assembly may be hiding an incomplete frame.

Slope, drainage, and service routes

Structural Inputs That Change a Flat Roof Truss Design - Queens Project Examples

Project Type Typical Span Range Support Condition to Verify Drainage Complication Coordination Risk
Rowhouse rear addition 14-20 ft Existing masonry rear wall may not be fully load-bearing to foundation; needs verification before trusses bear on it. Parapet on three sides limits scupper placement; slope must be directed to one outlet without creating low points mid-span. Mini-split linesets and condensate lines often conflict with truss depth at parapet wall.
Detached garage conversion 18-24 ft Garage walls are often non-structural or built on isolated footings not designed for the revised vertical load a converted roof places on them. Wide span with no internal bearing wall means drainage pitch must travel the full distance; slight deflection creates a center pond. New electrical panel and mechanical equipment on the same structure compete for soffit and truss depth clearance.
Mixed-use storefront extension 20-30 ft Steel column or CMU pilaster bearing points must be confirmed; anchor details to existing structure are often missing from original drawings. Signage, HVAC equipment, and grease exhaust penetrations all interrupt slope continuity and create potential ponding zones. Rooftop HVAC curb placement is almost always in conflict with optimal drain location on commercial spans.
Top-floor bump-out 10-16 ft Cantilever or flush bearing condition at building face requires careful check of existing floor framing below before new truss loads transfer. Tying into existing roof slope is rarely clean - transition zone between old and new framing frequently becomes the ponding location. Window header framing in the bump-out wall reduces bearing depth and forces truss connection geometry into a tight zone.
Multifamily small addition 16-22 ft Party wall bearing requires written confirmation from adjacent property review; assuming shared wall capacity without documentation is a common liability gap. Multiple unit drains and a single roof slope create flow conflicts when unit count and roof area aren't matched to drain sizing. Fire separation requirements between units can restrict where truss openings and mechanical penetrations are permitted.

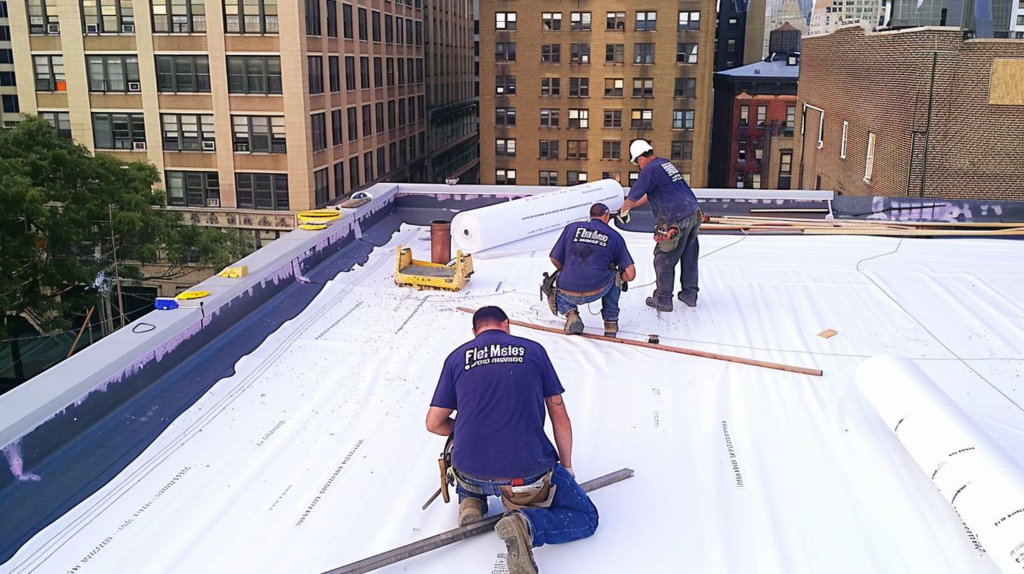
Assembling trusses without building movement into the roof

If you were standing next to me on the deck, I'd ask you one question: where does the load leave this truss, and what receives it next? That question sounds obvious, but assembly errors almost never look dramatic in the moment. They show up six months later as a slight shift along a bearing line, popping during temperature swings, uneven deflection across a bay, or a ponding spot that moves slightly from year to year because the frame underneath it is still settling. Don't skip this before assembly moves fast: mark bearing lines, drain direction, and mechanical no-go zones directly on the deck plates and rim board in marker, so every crew member - not just the lead - is reading the same map. I use a permanent marker on leftover underlayment and tack it where it can't be ignored. That's not fancy. It works.

A truss behaves a lot like a classroom seating chart - one bad placement and the whole room acts up. One humid August afternoon in Astoria, I got called after a customer heard popping sounds during a heat wave and was certain the membrane was failing. It wasn't the membrane. It was a poorly assembled flat roof truss system expanding and shifting because the spans had been guessed at rather than engineered. The whole crew had moved fast, the spacing looked right by eye, and then summer heat applied the real load test. I ended up explaining how to build a flat roof truss the slow, correct way while three electricians stood on the sidewalk waiting for us to resolve the structural question before they could finish their rough-in. Guessed spans are not a shortcut - they're a payment plan for a bigger problem later.

⚠ What You Should Not Accept During Flat Roof Truss Assembly

  • Field-guessing spans: Span dimensions must come from structural drawings, not from measuring with a tape on the day of install and rounding to the nearest truss in the yard.
  • Changing spacing without engineering approval: Shifting from 16" o.c. to 24" o.c. because materials ran short is not a site decision - it changes load distribution across every bearing point.
  • Cutting members to clear ducts: A truss chord or web cut to route ductwork is a structurally compromised member. That route needs to be planned before the truss is built, not remedied with a reciprocating saw.
  • Relying on shims to fix alignment: Shims correct minor tolerances. They don't fix bearing point misalignment or out-of-plane truss placement - those need to be reset, not shimmed over.
  • Treating ponding as a membrane problem when framing is moving: If ponding locations shift between seasons or the pond footprint changes, the framing is deflecting. A new membrane won't change that - it'll just hide it until the next layer of roofing is due.

Engineered and Coordinated vs. Field-Adjusted and Improvised

✔ Engineered & Coordinated

  • Load transfers cleanly from truss to bearing point without concentrated stress at any one location - deflection stays within code limits under full design load.
  • Drainage slope is built into top chord geometry; water moves toward the drain by gravity without relying on tapered insulation to compensate for flat framing.
  • Bracing and sheathing act as an integrated diaphragm - the roof plane resists lateral racking and thermal movement as a system, not as individual sticks.
  • Mechanical and structural zones are pre-negotiated; no members are cut, shifted, or undersized because duct routes were resolved before lumber was ordered.

✘ Field-Adjusted & Improvised

  • Load concentrates at improvised bearing points or skipped connections - deflection is uneven across bays, creating differential movement that shows as ceiling cracks and shifting sills inside the building.
  • Framing built level rather than sloped produces chronic ponding; water weight adds a live load the truss wasn't designed for, accelerating both membrane and structural deterioration.
  • Cut members and altered spacing break the engineered load path; the truss system behaves differently than designed, and that difference doesn't stay small under repeated thermal cycles.
  • Ductwork conflicts resolved on-site force compromise cuts that reduce structural capacity - the resulting frame is permanently weaker than drawings indicate, and there's no record of what changed.

Before You Call: What to Gather If You Think Flat Roof Truss Work Was Done Wrong

  1. Span measurements: Measure the interior span of the roof in question - width and length - and note whether you can access the framing space above the ceiling to confirm actual truss depth.
  2. Photos of bearing walls: Photograph where the roof meets the exterior and any interior walls below it, especially if you can see where the framing sits on the plate or masonry.
  3. Ceiling crack locations: Note or photograph any cracking, especially diagonal cracks near window or door headers, which often trace back to deflection in the framing above.
  4. Ponding areas after rain: Mark or photograph where water collects on the roof surface and how long it takes to drain - or whether it drains at all in certain bays.
  5. Roof plan or permit drawings if available: Original permit drawings or DOB filings give us the engineered intent to compare against what was actually built.
  6. Notes on popping or movement: Record when you hear structural movement - time of day, outdoor temperature, whether it coincides with direct sun on the roof - to help distinguish thermal expansion from active settlement.

Reading the early warning signs before the roof is finished

What can wait versus what needs fast review

Bluntly, a flat roof only looks easy from the sidewalk. Once you're involved in the structural work - or dealing with the aftermath of structural work someone else rushed - the early signals matter more than anything happening at the surface. A ceiling line that dips slightly near a window header isn't a drywall issue. Repeat ponding in the same bay after every rain isn't a membrane issue. Fresh cracking near a header on an interior wall, or a hot-day popping sound that started after a roof addition was completed - those are structural clues dressed up as cosmetic annoyances. Catch them early and the fix is proportionate. Wait until roofing layers go on, and you're not just fixing the structure; you're paying to expose it first.

Flat Roof Truss Warning Signs: Urgent vs. Can Wait

🔴 Urgent - Get a Structural Review Now

  • Visible sag over an opening - header or truss below is deflecting under load; don't wait for roofing to confirm this.
  • New crack pattern appearing at or after framing completion - especially diagonal cracks near headers or corners.
  • Repeated popping with heat changes that started after roof work - consistent thermal movement in a framed system that wasn't there before.
  • Ponding concentrated near a support line - water sitting on the bearing zone adds load directly where deflection risk is already highest.
  • Member cut or visibly altered on site - any field modification to a truss chord or web requires engineering review before roofing proceeds.

🟡 Can Wait - Schedule a Planning Review

  • Reviewing plans before the build starts - the best time to find conflicts is before any lumber is ordered or bearing conditions are committed.
  • Confirming slope on a new addition - if the addition is still in the framing stage and drainage direction hasn't been locked in, it can still be corrected.
  • Checking coordination before HVAC install - if mechanical runs haven't been finalized and trusses aren't fully sheathed, duct routes can still be negotiated without cutting members.
  • Asking about spacing before sheathing - if truss spacing needs adjustment and sheathing hasn't gone down, there's still room to make the correction cleanly.
  • Verifying a neighbor's addition that ties into your shared wall - worth reviewing before work on the party wall side starts, not after.

Your Questions About How to Build a Flat Roof Truss - Answered Directly

Can a flat roof truss be truly flat?
No - and any plan that shows a flat roof truss as perfectly level is leaving something out. Building codes and basic drainage physics require a minimum slope of ¼" per foot. That pitch is built into the top chord of the truss, not applied afterward with tapered insulation. The ceiling below can be flat. The structural framing that carries the roof can't be.
Who determines spacing and span limits?
A licensed structural engineer or a truss manufacturer's engineering department, working from the actual project loads and span. Spacing and span limits are not defaults - they're calculated outputs based on dead load, live load, snow and rain load, deflection limits, and connection details. A framing crew cannot make those calls in the field without an engineered basis.
Can drainage be fixed after the trusses are installed?
Partially and expensively. Tapered insulation can compensate for modest slope deficiencies, but it adds weight, cost, and depth - and it doesn't fix structural deflection that creates low points over time. If the trusses were built level when they should have had slope, the cleanest fix is to reframe. Tapered insulation is a workaround, not a structural correction.
Why do interior cracks show up when the roof problem is above?
Because load travels down. When a roof truss deflects - either from overload, poor bearing, or movement - it transfers that deflection into the wall framing and headers below it. The ceiling and wall finish materials crack at the weakest points in their assembly, which is usually at window and door headers, corners, and where dissimilar materials meet. Interior cracks near the top of a window in a room directly below a flat roof addition are often the first visible sign of framing trouble above.

If the framing already looks almost right but the roof is behaving wrong - ponding that won't quit, a ceiling line that shifted, sounds that started after the addition went up - don't let finish roofing go on top of a structural question. Call Flat Masters before the membrane hides the mistake. We inspect the structure first, and we tell you exactly what we find.

Faq’s

Flat Roofing FAQs: Everything Queens, NY Homeowners Need to Know

**How much does flat roof truss construction typically cost?**
Cost varies widely based on span, materials, and complexity. Residential projects typically range from $8-15 per square foot for materials and labor. Complex spans or commercial applications cost more. Get a detailed quote – proper engineering and professional installation protect your investment long-term.
Absolutely not recommended. Flat roof trusses require structural engineering calculations, proper load analysis, and specialized equipment. DIY failures can cause catastrophic damage and void insurance. Professional installation includes permits, inspections, and warranties that protect you legally and financially.
Timeline depends on project size and complexity. Residential jobs typically take 3-5 days after permits are approved. This includes engineered drawings (1-2 weeks), material procurement, and installation. Weather delays are possible. Professional crews work efficiently while ensuring structural integrity.
Delaying repairs leads to progressive structural damage, water infiltration, and potential collapse. Sagging trusses create ponding water that accelerates deterioration. Emergency repairs cost 2-3 times more than planned construction. Don’t risk safety or property damage – address structural issues promptly.
Look for visible sagging, water ponding after storms, or interior ceiling cracks. Professional inspection reveals deflection measurements and load capacity issues. Many older Queens buildings have undersized trusses that need upgrading for current codes. Get a structural evaluation for peace of mind.

Ask Question

Or

Torch-On Felt Is One of the Best Systems Around - If You Know What You're Doing

17 min read

Asphalt Shingles on a Flat Roof - They Might Not Be What You Think They Are

16 min read

Professional House Extension Flat Roof Installation & Repair

9 min read

Rubber Flat Roof Cost - Honest Pricing, Free Estimate

7 min read

How to Install a Rubber Flat Roof - or Let Our NYC Pros Handle It

6 min read

Professional Flat Roof Not Draining Solutions & Expert Repair

8 min read

Calculating Flat Roof Slope Sounds Technical - Here's How It Actually Works

13 min read

Professional Flat Roof Timber Frame Construction Services

9 min read

Which Roofing Felt Is Right for a Flat Roof? The Options Aren't All the Same

14 min read

Felt Flat Roofs Don't Last Forever - Here's How to Know When It's Time

15 min read

What's the Average Flat Roof Replacement Cost in Your Area?

8 min read

Flat Roof Felt Cost - Honest Pricing, Free Estimate in NYC

6 min read

Choosing the Right Flat Roof Installation Contractor Is the Most Important Decision

13 min read

Turning Your Flat Roof Into a Deck - Here's What the Installation Actually Involves

18 min read

Can My Tiny House Have a Flat Roof? Expert Roofing Solutions

7 min read

Professional Flat Roof Edge Trim Installation & Repair Services

7 min read

How to Measure a Flat Roof: Your Complete Guide

6 min read

Flat Roof Installation for NYC Properties - Built to Last

7 min read

Joist Spacing on a Flat Roof Isn't Guesswork - Here Are the Numbers That Matter

12 min read

Professional Budget Flat Roof Carport Installation Services

7 min read

Tarping a Flat Roof Isn't Like Covering a Tent - Here's the Right Way to Do It

13 min read

Your Flat Roof Might Just Need Resealing - Here's How to Know and What's Involved

16 min read

Flat Roof Water Pooling - Why It Happens and How We Stop It

6 min read

Understanding Scuppers on Flat Roofs: Your Complete Guide

6 min read

Rubber Flat Roof Sealing in NYC - Keep It Watertight for Years

7 min read
blue circle

Get a FREE Roofing Quote Today!

Schedule Free Inspection