Curb-Mounted Skylights on a Flat Roof - Here's Why They're the More Watertight Option
Why curb height changes everything on a flat roof
We can fix this, but first let's be clear about one thing: on a flat roof, a curb-mounted skylight is the more watertight choice - and that's not a preference, that's the roof telling the truth at every edge and height change where water decides whether it goes around or goes through. Queens property owners dealing with a leaking skylight, or thinking about adding one, need to understand why elevation above the membrane isn't a detail - it's the whole decision.
At 3/4 inch of ponding water, a roof starts exposing everyone's shortcuts. That shallow standing layer after a rainstorm doesn't look threatening, but it presses into every low seam, every under-height frame, every lazy corner wrap. Low-set skylights on flat roofs get punished exactly here - the frame sits too close to the membrane surface, the ponding line reaches the curb, and eventually water finds its way in. And honestly, that's not a weather problem. That's a height problem. If watertight performance is the priority, I choose curb-mounted units on flat roofs every time. A properly built curb lifts the transition point above where ponding water lives, gives flashing a clean surface to work with, and makes every subsequent membrane tie-in more forgiving to execute and easier to repair later.
⚠ Don't Mistake a New Unit for a Watertight Installation
A skylight can be brand new and still leak if the curb is too low, sitting out of square, or wrapped poorly at the membrane transition - and here's the thing, appearance is not proof on a roof. A clean dome and fresh caulk look finished from the street. They don't tell you anything about what's happening at the corners where the curb meets the field membrane.
Where flat-roof skylight leaks really begin
I'll say this plainly: flat roofs do not forgive low details. I remember a windy March morning in Ridgewood, around 7:15, when a bakery owner met me on the roof holding a towel because water had dripped through the skylight onto the proofing table overnight. The skylight itself looked new. The dome was clean, the sealant line looked touched up, and nothing about it screamed problem - except that the unit had been set too low for that flat roof, and the ponding line was practically introducing itself to the curb frame. Older mixed-use buildings in Ridgewood and similar neighborhoods across Queens often have roof surfaces with subtle low spots that developed over decades of thermal cycling and minor deck movement. Those spots don't show up on a dry day. They show up the night before someone needs their proofing table dry. That was one of those jobs where a proper curb-mounted skylight installation on a flat roof would have saved the customer from paying twice.
Now look at the edge. Corners, curb wrapping, and seam terminations are where the roof tells the truth - and that's exactly where I focus first on any skylight leak call. Marta Cevallos, with 19 years in flat roofing and a specialty built on chasing repeated skylight leaks in Queens buildings, knows that the dome is almost never where the water enters. The failure is almost always at the transition: a corner wrap that didn't go tight, a membrane termination that relied on lap sealant instead of proper geometry, a curb face that got one coat of flashing cement and called it done. Those details look finished on the day of install. They open up after the first winter freeze-thaw cycle, or after a summer where the roof hit 170 degrees three days in a row.
One rainy Tuesday in Elmhurst, I watched this exact mistake announce itself - water always introduces itself first at the bad transition, and the ceiling stain downstairs is just the delayed confirmation.
| Roof Detail | Common Failure Sign | Why Water Gets In | What Proper Curb-Mounted Work Looks Like |
|---|---|---|---|
| Curb Height | Leak appears after slow, steady rain - not just heavy storms | Frame sits within ponding depth; water contacts the curb-membrane seam continuously | Curb raised minimum 4 inches above finished membrane; verified before unit is set |
| Curb Corner Wrap | Water entry at interior corners; stain appears at ceiling near skylight edge, not center | Membrane folded instead of cut and wrapped; corner stress splits the seam over time | Corners cut, notched, and wrapped with consistent pressure; no bunching or bridging |
| Membrane Termination at Curb Face | Visible sealant cracking at top edge of flashing; staining below that line on interior | Lap sealant substituted for mechanical attachment; caulk fails under thermal movement | Membrane terminated and mechanically fastened under counter-flashing; sealant is secondary |
| Unit Seating on Curb | Leak tracks diagonally; may appear during wind-driven rain only | Unit sitting out of square creates gap on one side where wind pushes water under the frame | Curb checked for square before unit is set; shim-free, even bearing on all four sides |
| Field Membrane Slope Toward Opening | Chronic ponding visible at curb perimeter; leak after any rain, not storms only | Deck low spot concentrates runoff at skylight base; overwhelms even well-built flashing over time | Slope toward opening identified during inspection; addressed with tapered insulation before curb is built |
| Myth | Fact |
|---|---|
| "The dome is always the leak." | The dome rarely fails first. Most flat-roof skylight leaks trace back to the curb, membrane transition, or corner wrap - not the glazing unit itself. |
| "A newer skylight can't be the problem." | Age of the unit doesn't matter if the curb below it was built or seated poorly. A two-year-old skylight on a bad curb will leak like a twenty-year-old one. |
| "Caulk solves most skylight leaks." | Caulk is a finish, not a fix. If the underlying detail - curb height, membrane tie-in, corner geometry - is wrong, caulk buys a season at best before the same leak returns. |
| "Flat roofs only leak in heavy storms." | Low-set details fail during ordinary rain because ponding water doesn't need pressure - it needs time and a path. Heavy storms just speed up what's already in progress. |
| "Condensation means the whole unit failed." | Interior condensation is a ventilation and humidity issue, not necessarily an exterior leak. Conflating the two leads to replacing a unit when the real problem is a bad detail at the curb transition. |
Ponding line
The ponding line is the watermark left behind after rain drains slowly - or doesn't drain at all. On many older Queens buildings near Jamaica Avenue or along the mixed-use blocks in Woodhaven, roofs develop gradual low spots that only become obvious when you're up there after a storm. If a skylight curb sits at or below where that line forms, the frame is regularly bathing in standing water. Even a perfectly sealed joint doesn't hold up to that indefinitely. Height is the only real answer.
Wrapped curb corners
Corners are where the most competent-looking installations fall apart on closer inspection. Folding membrane around a square corner is faster than cutting and wrapping it correctly, and it looks identical from ten feet away. The difference shows up two winters later when that folded material has cracked at the stress point and water is moving through. Don't skip the tap-test on the corners - firmness there tells you whether the work was done with patience or just done.
How a proper curb-mounted skylight installation should be built
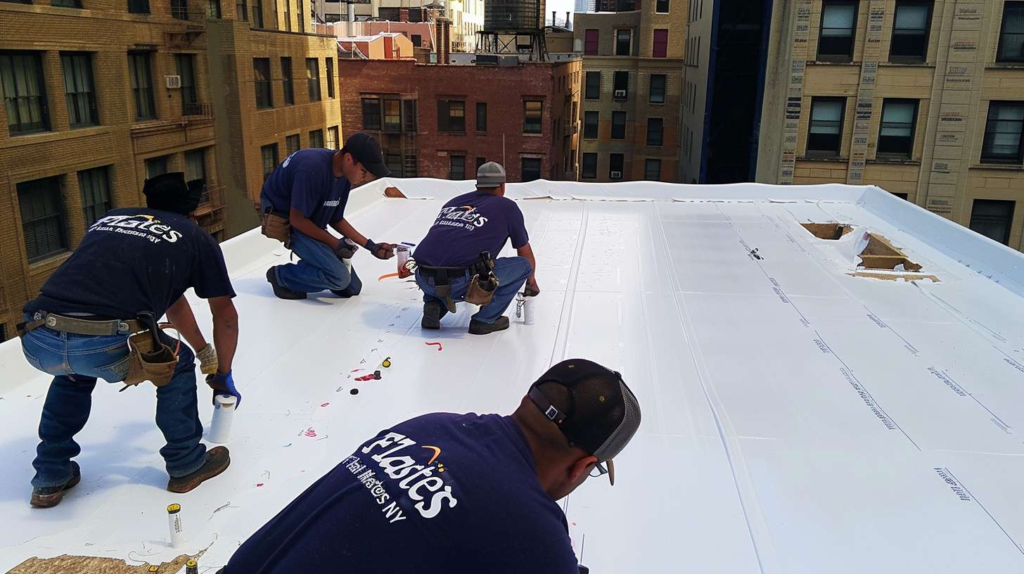
If you were standing next to me on the roof, I'd ask you one thing first: where do you think the water wants to go? That question shapes every decision - how high the curb needs to sit, whether the opening is truly level, how far the membrane needs to run up the curb face before it's locked down. One August afternoon in Astoria, the roof was hot enough to make my tape measure curl, and a co-op board president called me out swearing the leak only happened during sideways rain. She was right, and that was the clue. The dome wasn't the problem - the transition at the roof opening was. When I peeled back enough membrane to show her the detail, the curb had been wrapped lazily, like someone was gift-wrapping in the dark. The membrane had no meaningful attachment at the corners, and wind-driven rain was finding that gap every single time. A proper curb-mounted installation starts with checking the opening geometry, confirming the curb is tall enough for that specific roof's drainage behavior, making sure the unit will seat evenly on all four sides, and then tying the membrane into the curb with the same discipline you'd use on any vertical transition on the roof.
A skylight on a flat roof is like setting a window in the middle of a shallow tray - height and edges decide everything. Once I've confirmed the curb is the right height and sitting square, I go around it by hand, tapping the corners with my knuckle and pressing for stiffness. Here's the thing: fresh sealant on the surface tells you nothing about what's underneath it. Stiffness, straightness, and a corner wrap that doesn't give when you press it - that's the real report. This is where the roof tells the truth, and you'll find out faster by feel than by looking. At Flat Masters, this inspection step happens before any unit gets set, not after, because fixing a bad curb with the skylight already in place is three times the work.
-
1
Inspect the deck and rough opening
Check for soft spots, rot, or movement in the deck framing. Confirm the opening dimensions match the skylight unit and that there are no obstructions below that will complicate interior finishing. -
2
Verify curb height for flat-roof conditions
Measure from the finished membrane surface. Curb should clear the typical ponding depth for that specific roof, with a minimum of 4 inches. If the roof has a known low spot near the opening, height may need to increase. -
3
Confirm curb is square and structurally solid
Check all four corners for square and verify the curb top is level. Any twist or lean here means the skylight unit won't seat evenly - and an uneven seat is an open invitation to wind-driven water. -
4
Wrap membrane and corners correctly
Run the field membrane up the curb face with full adhesion. Cut and wrap corners - don't fold them. Terminate mechanically at the top edge. Sealant is applied after all physical attachment is complete, not instead of it. -
5
Set and fasten the skylight unit evenly
Lower the unit onto the curb with consistent bearing on all four sides. Fasten per manufacturer spec without over-driving fasteners. Confirm the unit hasn't shifted during fastening by checking square again from the top. -
6
Water-test and inspect interior and exterior signs
Run a controlled water test along each side and corner. Check inside for any tracking. Inspect the exterior for sealant gaps, membrane lifting, or any fastener head that didn't seat flush. Sign off only when the test is clean.
When repair is enough and when replacement is the smarter move
Here's the blunt truth nobody likes hearing after a leak: not every skylight problem needs a new unit, but some of them absolutely do, and the difference matters more for your budget long-term than short-term. When the curb is sound, the unit is structurally intact, and the failure is limited to a flashing seam or a membrane termination edge, targeted repair is the right call and it holds. Replacement becomes the smarter move when the curb is twisted, undersized for the current roof system, showing rot, or was site-built in a way that never let the unit sit square. I finished an emergency visit in Jackson Heights just before sunset after a bad thunderstorm, and the tenant upstairs was convinced condensation on the inside meant the whole skylight had failed. I walked him through the difference between interior humidity and actual exterior water entry, and then I showed him the real issue: an old site-built curb that had twisted slightly over the years, probably from building movement, and the unit never sat square again after that shift. No amount of re-caulking was ever going to fix that geometry. That job is the one I think about every time someone asks whether careful curb-mounted skylight installation on flat roofs is worth the extra time upfront.
The goal at Flat Masters isn't to sell a new skylight every time someone calls with a stain on the ceiling. The goal is to stop the repeat leak cycle - and that means being honest about whether the existing assembly can be corrected or whether it needs to be rebuilt from the curb up. A repair that holds for ten years is a better outcome than a replacement that gets patched again in eighteen months because the underlying detail was never addressed. That's the practical standard worth measuring against.
| Factor | Targeted Repair | Full Curb-Mounted Replacement |
|---|---|---|
| Upfront Disruption | ✔ Pro: Lower disruption, usually completed in a half day without removing the unit | ✘ Con: More involved; opening must be prepped, curb rebuilt, unit reset - typically a full-day job |
| Long-Term Watertight Reliability | ✘ Con: Only as reliable as the underlying curb - if the curb is the problem, repair won't hold long | ✔ Pro: Addresses the structural cause; when done correctly, should not require follow-up work for years |
| Compatibility with Current Roof | ✔ Pro: Works within existing assembly - no membrane disruption needed if curb is sound | ✔ Pro: New curb can be built to match current membrane system; ideal if reroofing is already in plan |
| Chance of Repeat Leak Calls | ✘ Con: High if the curb geometry or height was the real issue - the repair masks it temporarily | ✔ Pro: Low when properly built; eliminates the failure mode that caused the original problem |
Questions Queens owners ask before approving skylight work
Co-op boards, mixed-use building owners, and small commercial property managers in Queens all tend to ask the same practical questions before they sign off on skylight work - and honestly, that's the right instinct. The details matter more on a flat roof than almost anywhere else, and knowing what to ask upfront saves a lot of back-and-forth once the crew is scheduled. The questions below cover the most common sticking points, from unit height to wind exposure to whether a recurring caulk line is a red flag worth taking seriously.
