Building a Warm Flat Roof? Here's the Layer Build-Up That Actually Works
Layer Order That Keeps the Deck Warm
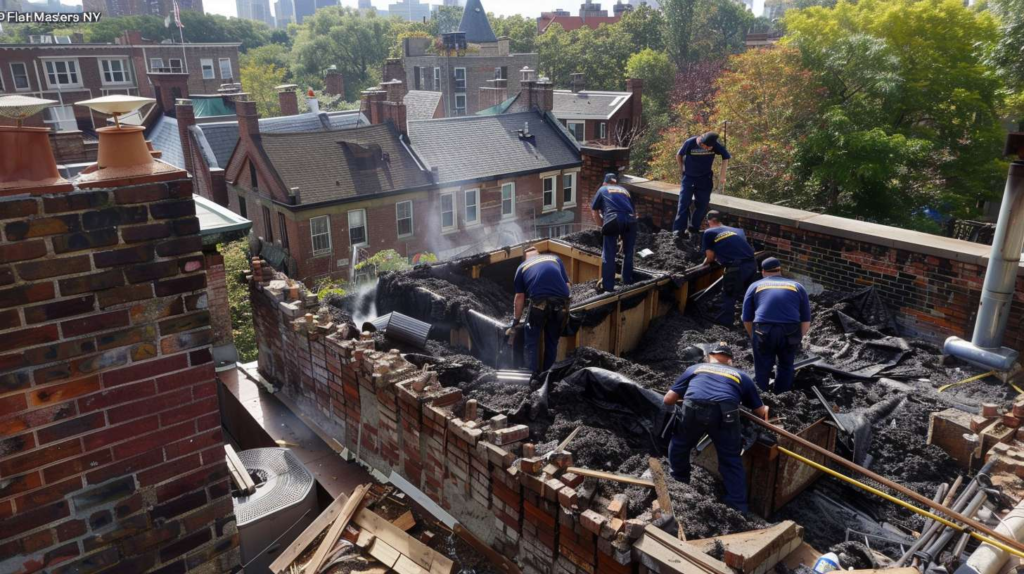
It's okay to push for a written explanation. In warm flat roof construction, the layer order matters more than the brand names on the packaging - one reversed component can turn what looks like a solid roof into a slow-motion moisture trap that stays polite for months before it starts ruining ceilings. On a Queens rowhouse, the first thing I look at is the deck, not the sales sheet. The correct sequence runs from the interior side up: structural deck at the bottom, vapor control layer directly above the deck when the design calls for it, rigid insulation above that, cover board where the spec requires it, and the fully adhered or mechanically fastened waterproofing membrane at the top.
A warm roof is a sentence - put the words in the wrong order and it still looks familiar, but it says something dangerous. Layers are syntax, flashing is punctuation, and leaks happen when the sentence is assembled out of order. And honestly, I'll say it plainly: I trust a boring, correctly sequenced assembly over a premium product pitch every single time. The best warm roof construction for a flat roof isn't the one with the fanciest membrane - it's the one where nothing is backwards.
| Layer Position | Component | Primary Job | What Goes Wrong If Misplaced |
|---|---|---|---|
| 1 - Bottom | Structural Deck (concrete, steel, timber) | Carries all loads; the foundation everything else depends on | Deflection, rot, or corrosion compromises every layer above it if deck condition isn't verified first |
| 2 | Vapor Control Layer (VCL / vapor barrier) | Stops warm interior moisture from migrating up into the insulation | Placed above insulation, it traps moisture inside the assembly - the single most common warm roof error |
| 3 | Rigid Insulation (PIR, EPS, XPS - typically tapered) | Keeps the deck and structure on the warm side of the thermal envelope | Gaps between boards create thermal bridging; incorrect tapered layout causes ponding water at low spots |
| 4 | Cover Board (high-density polyiso or gypsum-based) | Provides a stable, puncture-resistant substrate for membrane adhesion | Skipping it leaves membrane sitting on soft foam - foot traffic and hail cause compressions that void warranties |
| 5 | Primary Waterproofing Membrane (TPO, EPDM, modified bitumen) | Single continuous weather barrier from field through all detail transitions | Any break in continuity at details - hatches, drains, parapets - lets water enter silently under the field |
| 6 - Top | Surface Finish / Protection (ballast, pavers, solar, coating) | UV protection, additional load distribution, rooftop use where required | Heavy ballast on an undersized deck causes deflection; non-breathable coatings over a wet assembly accelerate blistering |
⚠ Watch Out: These Layer Mistakes Happen on Neat-Looking Roofs
- Vapor control layer above the insulation: This is the most damaging reversal in a warm flat roof build-up. Moisture from below the insulation migrates upward freely, then condenses against the misplaced barrier - rotting decks and collapsing insulation follow.
- Gaps left between insulation boards: Even half-inch gaps break the thermal envelope and create moisture channels. No amount of membrane quality compensates for discontinuous insulation underneath it.
- Tapered insulation treated as an afterthought: The slope-to-drain layout needs to be designed before the first board goes down - not improvised after the field is covered. A roof can look perfectly flat from the street and still pond water in the middle.
A roof can look completely finished from the sidewalk and still be internally backwards. Layer order isn't cosmetic - it's structural logic.
Mistakes Homeowners Mistake for Normal
Why neat-looking work can still be wrong
Here's the blunt version: insulation belongs where it keeps the deck warm, or you are solving the wrong problem. That sounds reasonable until you realize most people assume any roof labeled "warm" was automatically built correctly - because it looks finished, and nothing is dripping yet. I was on a rowhouse in Ridgewood at 6:40 in the morning, coffee still too hot to drink, when the owner told me her nephew had "basically finished" the warm deck flat roof construction over the weekend. I peeled back one corner and found the vapor control layer sitting above the insulation instead of below it. That roof looked neat from the sidewalk, but inside the assembly it was backwards - and as Marlene Vega, with 19 years in flat roofing and a reputation in Queens for correcting moisture-trapping warm roof assemblies, keeps pointing out, the kind of mistake that stays polite for six months before it starts ruining ceilings is always the one nobody caught at install.
Queens housing stock makes sequencing errors even less forgiving. Old wood decks on rowhouses along Jamaica Avenue, mixed-use buildings with commercial kitchens pushing humidity up through the ceiling, rooftop AC penetrations added years after the original roof - all of it means vapor is moving constantly and the assembly has to be right from the start. A clean new construction in Westchester might hide a layer error for a few winters. A rowhouse with a lived-in top floor and a deck that's already been through forty freeze-thaw cycles will punish a backwards assembly in one season.
| Common Myth | Reality |
|---|---|
| "Warm roof just means thick insulation." | A warm roof is defined by where the insulation sits - above the structural deck, keeping it on the warm side of the thermal envelope. Thickness affects performance but doesn't define the system type. |
| "Any membrane can hide a bad layer order." | A membrane manages water on the surface. It cannot stop moisture that's already migrating through a missequenced assembly underneath it. Concealed condensation doesn't show up until the damage is done. |
| "If there's no leak now, the build-up is fine." | Interstitial condensation from a misplaced vapor control layer can saturate insulation for a full year before any interior sign appears. No drip doesn't mean no problem. |
| "More adhesive fixes board gaps." | Adhesive bonds boards to the substrate - it doesn't fill the thermal gap between two insulation boards. Air and moisture still travel through a seam that hasn't been properly staggered or taped. |
| "Edge details are cosmetic." | Edge terminations, drip edges, and metal flashings are where the membrane's weather seal begins or ends. A field that's perfectly installed fails at the first storm if the perimeter detail is wrong. |
Penetrations, Edges, and Other Punctuation Marks
Where warm flat roof construction details usually fail
Last winter I opened up a roof edge in Astoria and learned, again, how expensive one skipped layer can be. It was a windy February afternoon - the kind where the membrane keeps trying to fold itself like a bad map - and I'd been called to look at a flat warm roof construction detail around a roof hatch. The materials were decent, no argument there. But whoever built it had crowded three terminations into eight inches and left the insulation running uneven underneath. I remember standing there with sleet hitting my glasses, thinking the same thing I always think at those moments: this is exactly why warm flat roof construction details matter more than brochure language. Water always finds the rushed corner.
How to read a crowded roof edge before it leaks
Every interruption in the roof plane - a roof hatch, a parapet wall, a drain, a scupper, a vent stack - is a place where the sentence of the roof breaks. Each one needs the vapor control layer to continue without gaps, insulation to maintain its height and support, and the membrane to turn up, wrap, or transition without pulling loose. The detail is not decoration. It's where the whole assembly either holds or unravels, and it's the last thing rushed crews think about when they're trying to get off the roof before dark.
Water does not care whether the field looks beautiful if the comma at the edge is missing.
📋 Show Me These Five Details on the Drawing
Ask your roofer to walk through each of these before installation begins.
Parapet Wall
Roof Hatch
Pipe Penetration
Internal Drain
Outside Edge / Metal Termination
Checks to Make Before Anyone Starts Fastening Boards
If you were standing next to me by the ladder, I'd ask you one question first: where is the vapor actually supposed to stop? It's not a trick question, but the answer depends on interior humidity levels, deck material, occupancy type, and the complete layer sequence above - not guesswork, and not whatever the crew has in the truck. I had a landlord in Sunnyside meet me at dusk after a tenant complained the top-floor bedroom was freezing even with the heat running full blast. He kept insisting, "But it's a warm roof, I paid for a warm roof." I cut a small inspection opening and found gaps between the insulation boards wide enough to slide my margin trowel through clean. I told him what I used to tell my middle-school students back in Jackson Heights: naming the parts correctly is not the same as assembling them correctly.
Before anyone starts fastening boards, ask for a marked-up layer diagram - a real one, drawn or annotated, showing the deck type, the vapor control layer location, insulation thickness and manufacturer, the tapered layout plan, cover board spec, membrane type, and every penetration on the roof. At Flat Masters, that document is what we build from, not a verbal summary. It's the single cheapest way to catch omissions while they're still a pencil mark and not a tear-out. If a contractor can't or won't produce one, that tells you something too.
How to Build a Warm Flat Roof - 6 Steps in the Right Order
-
1
Inspect and confirm structural deck condition.
Check for deflection, rot, corrosion, or previous patch layers that change the deck's effective thickness. Don't move to the next step until you know the deck can carry the new assembly load and won't trap moisture below the VCL.
-
2
Choose and locate the vapor control layer.
Confirm the VCL type based on interior humidity and occupancy, then install it directly above the structural deck with all laps sealed. Verify full coverage and no bridged gaps before any insulation goes down.
-
3
Install primary insulation and tapered layout.
Follow the tapered insulation plan drawn before installation - not figured out on site. Stagger all joints, and confirm boards are fully bearing on the VCL before the next layer goes over them.
-
4
Close gaps and stabilize the surface with cover board if specified.
Fill any board-to-board gaps and confirm the cover board is properly fastened before membrane work begins. Walk the surface and feel for soft spots - they mean an insulation joint isn't bearing properly.
-
5
Apply membrane continuously through field and all details.
Work the membrane from field to detail without breaking continuity - turn-ups, drain bowls, pipe boots, and perimeter metal should all be completed as part of the same installation sequence, not as afterthoughts.
-
6
Inspect all edges, drains, hatches, and penetrations before sign-off.
The final walk is about details, not field coverage. Confirm upstand heights, termination spacings, drain bowl seating, and hatch curb clearances before accepting the work - or requesting photos of every transition if you're not on site.
Questions Worth Asking Before You Sign Off
No, thicker does not automatically mean better if the assembly can't dry the way it should. A heavier insulation spec with a misplaced vapor control layer will trap moisture more efficiently than a lighter one - and look identical from street level while it does it. The conversation worth having with any contractor isn't about which membrane brand they prefer. It's about sequencing, detail continuity, and what happens at every interruption in the roof plane. Ask for the build-up in writing, then compare what's on that document against the actual materials and sequence that will be installed. If there's a gap between the two, that's the conversation to have before the first board is fastened - not after.
Warm Flat Roof Construction - Questions from Queens Property Owners
What is the difference between a warm roof and a cold roof on a flat roof?
Does every flat warm roof construction need a vapor control layer?
What is a warm deck flat roof construction detail at the edge supposed to include?
Can an existing flat roof be converted into a warm roof assembly?
How do I know the insulation layout is not leaving thermal gaps?
If you've got a warm flat roof build-up that needs checking before installation starts - or a quote that doesn't quite add up - call Flat Masters. We'll give you a clear written explanation of the assembly, layer by layer, so you know exactly what's going on your roof and why.
Serving Queens, NY - rowhouses, mixed-use buildings, and everything in between.
