Garage Flat Roof Giving Up? Here's What a Proper Replacement Involves
Wanting a written explanation isn't being difficult. Most garage flat roof failures in Queens aren't just the top surface giving out - they're usually about bad edge conditions, moisture that's been trapped under layers for years, and replacement shortcuts that looked like savings the first time around.
Why Garage Roofs in Queens Fail in Places Homeowners Cannot See
Let's label the parts before we blame the parts. A flat garage roof isn't one thing failing - it's a system where water enters at one point, migrates along deck joints or seams, and shows up dripping somewhere that has nothing to do with the actual break. That's the part that trips people up. The drip in the corner of the ceiling might have started at the rear edge, traveled six feet along a fastener line, and only appeared inside when the decking finally got soft enough to release it. You're not looking at a hole. You're looking at the end of a water story that started somewhere else entirely.
Nineteen years in, the first place I still look is the back edge of the garage. I remember a drizzly Tuesday in November, around 7:10 in the morning, standing behind a detached garage in Woodside with a homeowner still in hospital scrubs because she'd just gotten off the night shift. She told me two roofers had already given her a price for a flat garage roof replacement without ever stepping onto the roof. When I got up there, the real problem wasn't just the membrane - the back edge had no proper drip detail, and the decking near the gutter line felt like wet cereal. I'm Rosa Medina, with 19 years in flat roofing and a Queens specialty in garage-specific flat roof replacement, and that Woodside roof is exactly why I don't trust any number that was figured out from a driveway. Pricing without inspecting edges and deck condition isn't a quote - it's a guess with a dollar sign on it.
Myth vs. Fact: Garage Flat Roof Replacement in Queens
| Myth |
Real Answer |
| "If the leak shows in the middle, the hole is in the middle." |
Water travels. It enters at an edge, seam, or parapet transition and follows the path of least resistance - sometimes across the entire deck before it drops. Visible drips are rarely directly below the entry point. |
| "A new layer over the old one always saves money." |
Not when the existing layers are wet or the deck is soft. Multiple layers trap moisture, add dead load, and cover deck damage that will cost more to fix later. The "savings" get paid back double at the next failure. |
| "It's a small garage - details matter less." |
The opposite is true. A small roof has a higher ratio of edge and corner length to total field area. On a one-car garage, the perimeter is where nearly all the failures happen - and there's a lot of perimeter relative to field. |
| "All flat roof materials install the same way." |
EPDM, TPO, modified bitumen, and built-up systems each have different seam methods, flashing requirements, and termination details. A crew trained on one system and applying another without adjusting is how edge failures happen fast. |
| "If a contractor can price it from the driveway, that's efficient." |
It's the opposite of efficient. Driveway pricing skips deck condition, existing layer count, edge detail complexity, and drainage problems. Those are exactly the variables that change the scope after tear-off - and the homeowner absorbs that surprise. |
⚠️ Warning: Replacing Only the Visible Top Surface
Covering wet insulation, soft decking, failed drip edges, or compromised parapet transitions doesn't stop the leak - it just delays it and hides it. When that roof fails again, the damage underneath will be worse and the repair scope will be larger. Misleadingly low bids almost always omit these components. If the proposal doesn't mention deck inspection, edge metal, and flashing scope, the number isn't real.
What a Proper Replacement Actually Includes Before Anyone Talks Numbers
Parts Rosa Labels on Every Inspection
Let's be honest: if someone priced your roof from the driveway, that number is fiction. Part one is the membrane and seams - yes, the top surface matters, but it's not where inspections end. Now the edge: drip edge, coping, rear wall tie-in, parapet transition, and termination points where the membrane meets any vertical surface. Every one of those is a potential entry point. Next variable is the deck itself - the wood substrate under everything - plus insulation condition and how many existing layers are already stacked up there. In Queens, those variables get complicated fast. A lot of garages here are detached, sitting at the back of narrow lots with alley access, hemmed in between houses with maybe two feet of clearance on each side. Getting materials in and debris out on a rear-yard garage in Jamaica or Ozone Park is a different project than a suburban garage with a wide driveway. Settlement patterns matter too - older detached garages in Queens often show slope changes toward the back edge, which is exactly where ponding develops and where I start looking first.
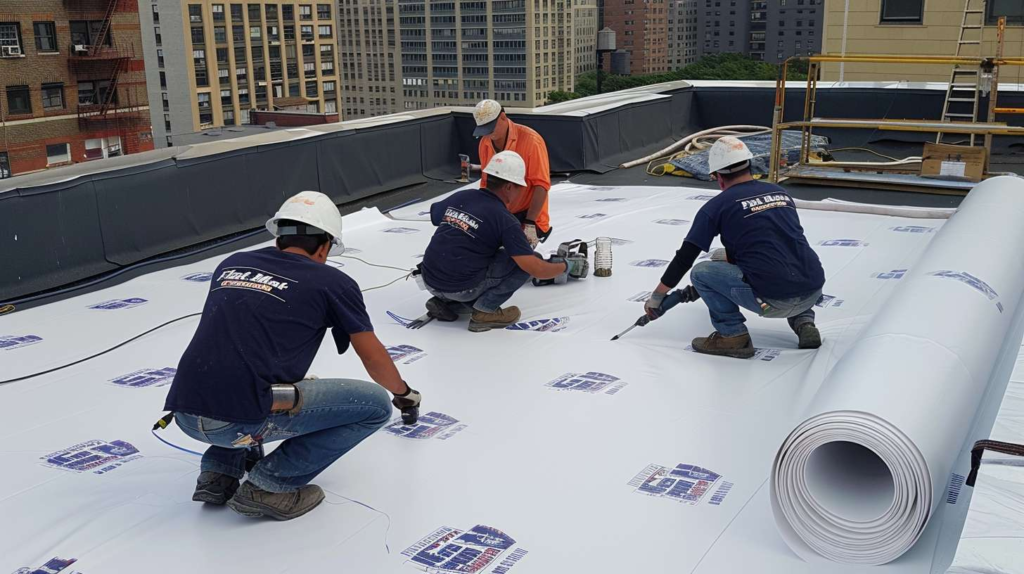
The full sequence of a flat garage roof replacement goes like this: tear-off of existing material, substrate inspection once the deck is bare, deck replacement where boards are soft or damaged, insulation or slope correction where the assembly calls for it, membrane installation across the full field, flashing and edge metal at every transition, a drainage check to confirm water moves toward the drain or scupper instead of sitting, and then cleanup. That's not a long list, but every step has a quality check built into the one before it. And honestly, my plain opinion is that adding another layer over a wet or soft garage roof is almost never the right call. There are narrow conditions where a recovery board and new membrane make sense - documented, inspected, deliberate - but covering a failing substrate because it's cheaper upfront is just postponing a more expensive conversation.
Exact Sequence: Garage-Specific Flat Roof Replacement
1
Access and Protection Setup
Landscaping, vehicles, and any structures near the garage get protected before anything starts. On Queens jobs with tight alley access, this also means staging debris removal logistics before the first layer comes off.
2
Cut Test / Open Roof and Verify Layers
Before full tear-off, a sample cut confirms the number of existing layers, insulation type, and moisture presence. On a Queens garage, this is where the real story often starts - and sometimes the scope changes before the first full strip begins.
3
Full Tear-Off
All existing material comes off down to the deck. Partial tear-offs hide the moisture damage you're paying to fix. The homeowner should expect noise, debris hauling, and a bare wood deck visible by end of day one on most garage jobs.
4
Inspect and Replace Damaged Decking
Every soft, delaminated, or wet board gets pulled and replaced with new plywood. On older Queens garages, especially those built in the 1940s and 1950s, this step often reveals more replacement area than the initial estimate assumed.
5
Install Insulation or Recovery Board
Insulation type and thickness depend on the specified system and local code. Where ponding is a problem, tapered insulation can correct low spots. The homeowner should ask specifically what's going in at this layer and why.
6
Install Membrane and All Edge / Flashing Details
The membrane goes down across the full field, then every edge, penetration, and wall transition gets properly flashed and terminated. This step is where cheap jobs and complete jobs diverge - the field is easy; the edges take skill.
7
Final Water-Shedding Check and Cleanup
Before the crew leaves, drainage paths get verified and the roof surface is checked for standing water risk. On a Queens job, that means confirming the scupper or interior drain is clear, the gutter connection is solid, and the site is clean - dumpster out, no debris left in the shared driveway.
What Should Be in a Serious Replacement Proposal
- ✅ Tear-off extent - how many layers are being removed and confirmed by inspection, not assumed
- ✅ Deck replacement allowance language - what happens if damaged boards are found after tear-off, and at what unit cost
- ✅ Material system name - specific product, manufacturer, and application method (not just "rubber roof" or "flat roof material")
- ✅ Flashing scope - which transitions are being reflashed and with what material
- ✅ Edge metal scope - drip edge, coping, and termination bar details explicitly listed
- ✅ Drain / scupper / gutter handling - what's being done with existing drainage, and whether it's being reset or replaced
- ✅ Cleanup and disposal - who hauls the old material, where it goes, and what the site looks like when the job is done
- ✅ Workmanship warranty terms - duration, what's covered, and who to call if there's a problem after the job closes
How Queens Homeowners Should Think About Cost Without Getting Trapped by a Cheap Bid
What would I ask you before talking about cost? Garage size first - square footage sets the baseline. Then: how many layers are already on the roof, what condition the deck is likely in, whether the garage is attached to the house or sitting at the back of the lot, how complex the edge details are, whether the slope needs correction, and how debris gets out - through a narrow side yard, a shared driveway off Hillside Avenue, or an open rear alley. All of that changes the number before we've even talked materials. I was in Ridgewood one August afternoon, that heavy Queens heat that makes every roof surface feel ten degrees hotter than the air, and I peeled back a corner on what was supposed to be a simple flat garage roof replacement and found three generations of roofing stacked on top of each other. The owner kept saying, "Can't you just put one more layer?" I showed him the crushed insulation and explained it plainly: this roof is like putting a winter coat over a soaked sweatshirt - technically possible, practically dumb. He understood immediately. That's the kind of thing that doesn't show up in a driveway quote.
Cost ranges are scenarios, not promises. The real number gets confirmed after tear-off, when you can actually see the deck. A bid that comes in significantly lower than others almost always got there by excluding deck replacement language, assuming minimal edge work, or skipping the flashing rebuild. Those are exactly the parts that usually fail first. Read every proposal against what it actually includes, not just what it costs.
Are you comparing numbers, or are you comparing what those numbers actually buy?
Garage Flat Roof Replacement Cost Scenarios - Queens, NY
| Scenario |
Typical Roof Condition |
Likely Scope |
Estimated Price Range |
| Small detached garage, 1 layer, sound deck |
Single existing layer, clean deck boards, straightforward rear-yard access |
Tear-off, basic edge metal, new membrane, minor flashing |
$2,800 - $4,500 |
| Average one-car garage, moderate edge work |
1-2 layers, some edge deterioration, rear wall flashing issues |
Full tear-off, edge metal replacement, rear-wall reflashing, new membrane |
$4,200 - $6,500 |
| Two-car garage, difficult rear access |
Standard condition but tight alley or shared driveway access adds labor |
Full replacement plus access logistics, extended cleanup scope |
$5,500 - $8,500 |
| Garage with soft deck sections requiring plywood replacement |
Long-term moisture exposure, partial deck failure, visible soft spots |
Full tear-off, partial deck replacement (est. 30-60% of field), full membrane and flashing |
$6,000 - $10,000 |
| Multiple old layers, extensive flashing rebuild |
3+ stacked layers, failed parapet transitions, compromised perimeter |
Complete tear-off, deck assessment, full flashing rebuild, heavy disposal costs |
$8,500 - $14,000+ |
Final cost depends on tear-off findings and exact material system. Deck replacement and additional flashing scope are confirmed after the roof is opened - not before.
Cheap Bid vs. Complete Bid - What You're Actually Comparing
Low Number That Sounds Good
- Tear-off assumed, not inspected - layer count guessed from the ground
- Deck inspection not included - soft boards found after tear-off become a surprise invoice
- Edge metal not mentioned - old or absent drip edge stays in place
- Flashing scope vague - "as needed" language with no defined limit
- Disposal not specified - debris may be left for the homeowner to arrange
- Warranty unclear - "we stand behind our work" with no defined term or coverage
- High change-order risk - final invoice often 20-40% above the original number
Complete Replacement Scope
- Tear-off confirmed by cut test - number of layers documented before work begins
- Deck replacement allowance written in - unit cost per sheet stated upfront
- New drip edge and perimeter metal included as a line item, not an afterthought
- Flashing scope defined - specific transitions named, specific material listed
- Disposal included - dumpster or haul-away confirmed, site left clean
- Warranty with specific terms - years, coverage type, contact process
- Change-order risk limited - scope is defined, and surprises are explained before they're charged
Where Leaks Usually Start When the Drip Shows Up Somewhere Else
Last winter in Maspeth, I pulled up a seam with two fingers and the whole story came with it. The membrane had separated at a lap joint near the rear wall - not because the field failed, but because the termination bar at the top of the wall had never been properly sealed, and freeze-thaw cycles had been working at it for years. Water doesn't drip straight down through a flat roof the way people picture it. It follows seams, runs along fastener rows, travels down deck joints, and moves through wall intersections before it finds a low point and drops. The drip you see inside the garage is the end of the trip, not the beginning. Here's the thing worth knowing before anyone picks up a caulk gun: always inspect parapet joints, rear-wall tie-ins, and perimeter metal before assuming the center field failed. The center of the roof is the easiest part to install correctly. The edges are where shortcuts hide longest.
Decision Tree: Does This Garage Roof Need Replacement or Further Diagnosis?
Start: Active leak or interior staining?
→ YES
Has it already been patched more than once?
→ YES
Any soft spots, bubbling, or multiple roof layers visible?
→ YES
Full replacement is likely. Schedule an on-roof inspection - not a driveway estimate.
→ NO soft spots or bubbling
Inspect edges and flashing closely before assuming field replacement. May still be a candidate for replacement depending on findings.
→ NO prior patches
Inspect edges, rear-wall tie-in, and perimeter metal first. The leak may be a flashing failure, not a full membrane failure.
→ NO active leak
Is the roof over 15-20 years old or showing open seams at the edges?
→ YES
Schedule an inspection for replacement planning. A roof this age with open seams is close to the end of its reliable life, even without an active drip yet.
→ NO
Maintenance and monitoring path. Document current condition with photos, clear drainage regularly, and schedule an inspection every 2-3 years.
Questions Worth Asking Before You Replace a Flat Garage Roof
The Answers That Separate a Roofer from a Guesser
Here's the blunt truth most people do not get told about a flat garage roof replacement: the questions you ask before signing anything are the actual protection. Vague proposals stay vague until after tear-off, and by then the crew is already on your roof. Good questions force specifics - what system, what flashing, what happens if the deck is soft, who hauls the debris. I once inspected a one-car garage near Astoria just before sunset in March, wind coming sideways between the houses, and the customer was completely convinced the leak was dead center because that's where it dripped onto his workbench. It actually started at the parapet joint, traveled along the underside of the deck, and dropped six feet away. That job is the one I go back to every single time someone asks me how to replace a flat garage roof without properly checking the edge details first - because if we'd just patched the middle, we'd have been back in three months doing the same conversation.
A garage roof behaves a lot like a classroom lab table - if one corner is off, the whole experiment rolls downhill. Slope, edge termination, and wall transitions work as a connected system. Get one wrong and the others absorb the consequences. The checklist below gives you a starting point before you make any calls, and the FAQ right after it covers the questions that come up most often at Flat Masters. Use both before you commit to any number.
Before You Call for an Estimate - What to Have Ready
- 📐 Approximate garage size - rough square footage or exterior dimensions (even pacing it off helps)
- 🏠 Attached or detached - whether the garage shares a wall with the house affects flashing scope
- 📅 Age of the roof if known - original build year or last replacement year, even an estimate
- 🔧 Number of prior patches - how many times it's been worked on, even informally
- 📸 Photos of interior leak spots - ceiling stains, wall staining, or any wet insulation visible from inside
- 💧 Whether water ponds after rain - note where it collects and how long it takes to clear
- 🚪 Access route to the garage - narrow side yard, shared driveway, rear alley, or open lot - this affects labor and debris removal logistics
Homeowner Questions About Garage Flat Roof Replacement in Queens
How much does it cost to replace a flat roof on a garage in Queens?
Ranges in Queens run roughly $2,800 on the low end for a small detached garage with one layer and a sound deck, up to $14,000 or more for a larger garage with multiple stacked layers, deck damage, and a full flashing rebuild. The honest answer is that the final number isn't confirmed until after tear-off - deck condition and layer count are the two variables that move the price most. Any firm number given without getting on the roof should be read as a starting estimate, not a contract figure.
Can you replace just part of a flat garage roof?
Technically yes, but it's rarely the right call on a garage. Flat roofs function as a connected membrane system - patching one section while leaving aged or failed material elsewhere means the next weak point is just a few feet away. Partial replacements make more sense on large commercial roofs where one section is clearly isolated. On a typical Queens garage, it usually costs less in the long run to do the full replacement once than to do half a job twice.
How long does a garage flat roof replacement take?
Most single-car and two-car garage replacements in Queens are completed in one to two days. That assumes no major surprises on the deck. If significant decking replacement is needed, add half a day to a full day. Access difficulty - narrow alley, tight side yard, shared driveway - can also add time to setup and cleanup. You'll want a clear weather window of at least two dry days, especially for modified bitumen systems.
Do you have to remove all the old layers first?
In most cases on a Queens garage, yes. Local building code limits how many layers can be stacked, and more importantly, installing over wet or soft substrate guarantees a shorter life on the new membrane. There are situations - sound, dry substrate, single existing layer, right material pairing - where a recovery board and new membrane makes sense. But those conditions need to be confirmed by inspection, not assumed to save money upfront.
What is the best material for a garage-specific flat roof replacement?
There's no single "best" - it depends on the deck condition, edge details, drainage setup, and what the crew is properly trained to install. In Queens, modified bitumen (torch-applied or cold-applied) is common on garages because it handles temperature swings well and is durable at edges. TPO and EPDM are also solid choices when installed correctly with proper termination details. What matters more than the material name is whether the installation crew knows that specific system's flashing requirements - that's where failures happen regardless of which membrane is on the field.