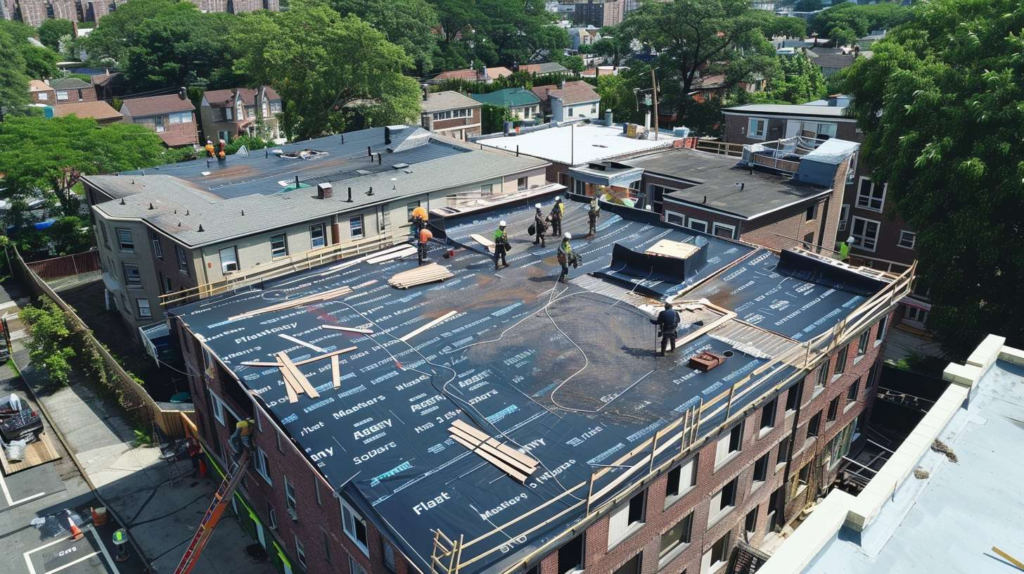
A Rear Extension With a Flat Roof Is One of the Best Ways to Add Space to a Home
Forget the modern aesthetic-that's not why a rear extension with a flat roof beats most other options on a Queens lot. The real advantage is pure spatial efficiency: you get every cubic inch of your addition working as livable space, as long as the roof is designed around water movement from day one.
Why a Flat-Roof Rear Addition Often Wins on Tight Queens Lots
On a 20-foot-deep Queens backyard, every inch has a job. A rear extension flat roof keeps your ceiling clean and consistent, with no wasted volume lost to rafters climbing toward a ridge. That matters enormously on the narrow-lot geometry you find across rowhouses in Corona, Elmhurst, and the denser blocks near Junction Boulevard-where a pitched rear addition would either eat into your headroom or push the roofline up in a way that creates neighbor complaints before the permit is even filed. And honestly, I'd rather use a plain roof form that preserves usable space than a fancier shape that wastes it. Practical beats pretty when the yard depth is already working against you.
That said, here's the thing that trips people up immediately: flat doesn't mean level. A proper flat roof rear extension still requires intentional pitch built into the framing, and drainage planning has to happen before a single sheet of plywood goes down. Call it a low-slope roof if you want the technical term-but call it level and you've already started down the wrong path.
| Decision Factor | Rear Flat Roof Extension | Pitched Rear Extension Roof | What It Means for a Queens Homeowner |
|---|---|---|---|
| Usable Ceiling Area | Full flat ceiling across 100% of floor plan | Tapers toward walls; usable zone shrinks | Flat roof gives you more room to furnish and move around |
| Mechanical Routing Flexibility | HVAC, vents, and mini-split lines route straight through flat deck | Rafters and ridge constrain duct and line paths | Easier to plan mechanicals-but penetrations still need a water strategy |
| Drainage Planning Complexity | Requires deliberate slope, drain, and overflow design | Gravity does more work; gutters handle runoff at edges | Flat roof demands more planning upfront-skipping it is where problems start |
| Fit on Narrow Lots | Low profile respects neighbor sightlines and zoning height limits | Ridge height may conflict with rear-yard zoning restrictions | Flat roof is almost always the cleaner permit conversation in dense Queens blocks |
Quick Facts - Rear Extension Flat Roofs
Best Use Case
Tight urban lots where ceiling height and yard depth need to work together
Biggest Risk
Poor drainage design-specifically, a deck that traps water instead of moving it
Best Time to Catch Problems
At the framing stage-before plywood, membrane, or finish work is in place
Most Overlooked Issue
Where vents, scuppers, and mechanical lines compete for the same limited roof real estate
Where Rear Extension Flat Roof Projects Usually Go Wrong
Drainage mistakes that look harmless at first
I'll say this plainly: most failures are design failures long before they become roofing failures. I still remember a damp Tuesday morning in Maspeth-about 7:10 a.m.-standing in a couple's backyard after their first real rainstorm. They'd spent serious money on a rear extension flat roof that looked genuinely clean and modern. One overnight storm, and water sat dead-center like a birdbath. I took out a chalk line, showed them the low point, and said, "Pretty is nice. Drainage is nicer." That roof had no bad materials. It had bad geometry. And in dense Queens neighborhoods like Ridgewood and Forest Hills, where rear yards are packed tight and property lines don't give you room to redirect runoff creatively, a drainage mistake doesn't just ruin a roof-it runs out of options fast.
Penetrations and parapets that steal your margin for error
That sounds reasonable, but here's where it fails once water gets involved: the moment you add a kitchen exhaust vent, a mini-split line set, a roof drain, and a scupper to the same compact deck, they start competing with each other for position. One August afternoon in Kew Gardens, I got called to a flat roof rear extension where the architect had drawn a beautiful boxy addition-genuinely lovely on paper. But nobody had coordinated where the kitchen vent, the mini-split lines, and the scupper would all land. The homeowner, a retired piano teacher who had been impressively calm through the whole renovation, stopped being calm when water dripped near her new recessed lights. I spent half an hour moving my hand around the roof plan like I was conducting an orchestra, showing her how every single element had to stop competing with the water path and start working with it.
A flat roof should never be designed as a dead-flat tray. Here's the simplest way I know to explain it: in a seventh-grade science class, if you tilt a tray the tiniest bit and pour water on it, that water finds the low edge every single time-without being told, without a plan, without anyone paying attention. Your roof deck works exactly the same way. The difference is, if nobody built that tilt in deliberately, water finds its own low point-and that low point is usually somewhere you didn't choose and can't easily fix.
Myth vs. Fact - Rear Extension Flat Roofs
| Myth | Real Answer |
|---|---|
| "Flat roofs are actually flat." | A properly built flat roof has a minimum ¼-inch-per-foot slope built into the framing or insulation to move water toward a drain or scupper. Dead flat is a construction defect. |
| "Ponding is mostly a cosmetic issue." | Standing water accelerates membrane deterioration, adds structural load, and signals a drainage failure. A quarter inch of water sitting on a 200-square-foot deck weighs over 300 pounds. |
| "One drain is always enough." | Every flat roof rear extension needs a primary drainage outlet and a secondary overflow path. One clogged drain during a hard Queens rainstorm can back up faster than most homeowners expect. |
| "Parapets automatically make a roof safer." | Parapets hold water in if overflow and scupper locations aren't planned with them. A parapet without a clear overflow route is a bathtub wall. |
| "Penetrations can be decided after framing." | Every penetration location affects the water path. Lock them in before framing is approved-not after the deck is down and the slope direction is already fixed. |
⚠ Warning - Don't Approve Framing Without Confirming Drainage Paths
Once framing is locked, parapet heights are set, and mechanical locations are placed, correcting low spots and blocked drainage becomes a major expense-not a quick fix. The framing stage is your last low-cost opportunity to redirect the water path.
Here's what makes it worse: leaks caused by design errors almost always appear after finish work is complete-drywall, lighting, flooring. That timing makes a planning mistake look like a roofing defect, and it means the damage is already done before anyone realizes the roof was the problem from day one.
How to Judge the Design Before the Roofing Starts
When I ask a homeowner where they think rain is supposed to go, I'm not making small talk. I'm checking whether anyone in the design chain has actually answered that question on paper before the membrane goes down-because Nilda Serrano, with 19 years building and repairing flat roofs across Queens and a specialty in catching rear-extension drainage errors before roofing day, has seen how early questions save late money. The best thing you can do at the framing stage is ask your contractor to stand on the deck and physically point to the high point, the low point, the primary drain or scupper, and the overflow route. If they can't do it without hesitating, that's your answer about how well the drainage was planned.
If you stood on that framed extension during a hard storm, could you point to the exact exit route for every gallon of water?
Pre-Roof Review - 5 Steps for a Flat Roof Rear Extension
Before You Call a Roofer - Gather These First
-
✔
Extension dimensions - have the square footage and overall footprint written down, including any irregular shapes or bump-outs. -
✔
Current framing stage - know whether you're pre-framing, mid-framing, or at the sheathing stage, since the options available change dramatically at each point. -
✔
Planned drain type - find out whether the design calls for an interior drain, edge scupper, or overflow outlet, and note that detail before the call. -
✔
Parapet yes or no - confirm whether the design includes a parapet on any side and, if so, on which walls and at what height. -
✔
Mechanical items on the roof - list every vent, mini-split conduit, exhaust cap, or skylight that's planned for the deck so penetration conflicts can be reviewed early. -
✔
Photos of the rear wall and yard - take clear photos of the existing rear wall, the yard depth, and any adjacent structures so the roofer can assess drainage options before arriving on site.
Questions That Separate a Durable Build From a Pretty Mistake
Ask these before materials are ordered
One evening in Woodside, I caught this before the plywood was even down. The homeowner could only meet after her hospital shift, so we were out there with a flashlight and a couple of takeout coffees from a spot on Skillman Avenue, looking at her framed rear extension in the dark. And that turned out to be the lucky part-because the parapet detail as drawn would have created a shelf that trapped snowmelt against the rear wall every single winter. Freeze-thaw in a Queens February isn't gentle; that water expands, works into the wall assembly, and shows up inside the house months later as a mystery stain nobody can explain. I told her exactly what I've told a hundred homeowners: I'd rather be early and annoying than polite and expensive later. The point of walking through these questions isn't to turn you into a roofer-it's to help you hear whether your contractor has an actual drainage plan or just the vocabulary of one.
The best rear extension flat roof conversations are simple. Where does water go? What happens during a freeze-thaw cycle in January? What happens if the primary drain clogs during a heavy storm? A contractor who answers those three questions clearly, without stalling or vague reassurances, is a contractor who planned the roof before they started selling it.
A rear flat roof extension is one of the smartest moves you can make on a tight Queens lot-but only when the drainage logic is settled before the first roll of membrane is unloaded from the truck. If your project is still in planning or framing, call Flat Masters now and let us review the drainage design before roofing day.
