Getting Flat Roof Skylights Right Comes Down to the Installation Details
More. Leaking skylights get blamed on the glass unit more often than they deserve - but in nearly every callback I've walked into across Queens, the skylight itself was fine. The failure was in the curb, the membrane tie-in, or the sequence of how the whole assembly came together. This article walks you through exactly how flat roof skylight details succeed or fail, layer by layer, starting at the deck and working up.
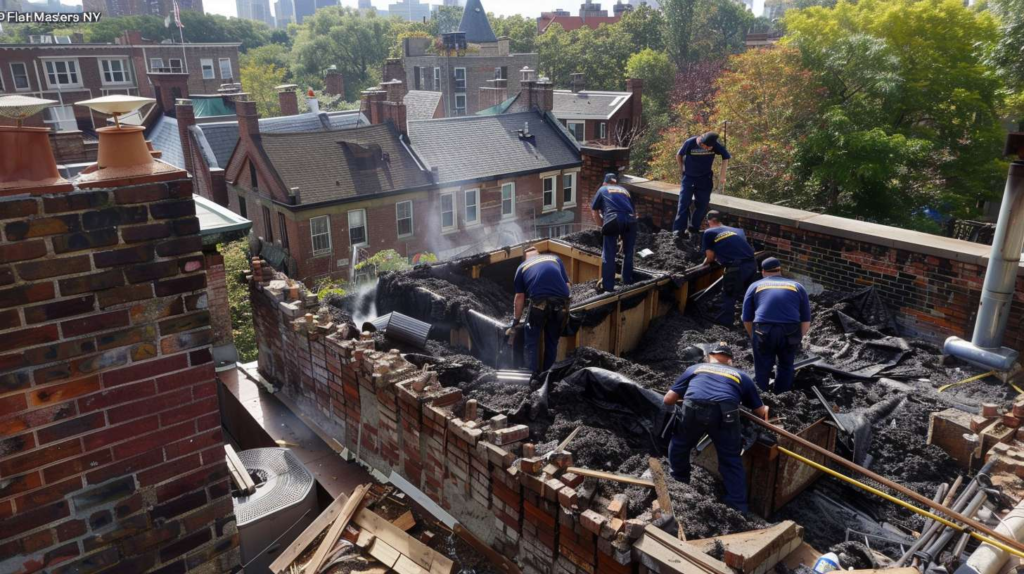
Why the curb assembly decides whether the skylight stays dry
Leak paths travel like gossip: they never show up where you first heard about the problem. When I tap three spots on a roof - deck, curb, membrane - I'm not doing a performance. I'm tracing the actual route water takes before it decides to ruin someone's ceiling. The curb assembly is where most of that route gets determined, which is why a skylight unit can be brand new, perfectly glazed, and factory-sealed, and still produce a steady drip inside a Queens rowhouse every time a nor'easter rolls through.
Here's the thing: water doesn't confess where it entered. It travels - through laps, under turn-ups, along framing, and sometimes across three feet of insulation before it shows up as a stain somewhere that makes no geometric sense. Deck first, then curb, then membrane, now flashing - that's the sequence I walk through every time, and the leak is almost always waiting at one of those handoffs, not at the glass above it.
| Myth | Fact |
|---|---|
| If water shows at the frame, the glass seal failed. | Frame-adjacent staining almost always traces back to the membrane tie-in at the curb base, not the glazing. Water enters at the curb, travels along framing, and surfaces at the nearest visible edge. |
| More caulk fixes most skylight leaks. | Sealant can't bridge a missing membrane turn-up or compensate for a curb that's too short. It degrades within a few seasons and gives the water a new channel once it cracks. |
| Factory flashing solves everything. | Factory-supplied flashing is designed for correct installation conditions. If the curb isn't square, isn't the right height, or if the membrane wasn't turned up first, factory flashing just covers the problem temporarily. |
| A curb that looks close enough is fine. | Curb height must clear the finished roof plane by a minimum of 8 inches in most specifications. "Close enough" means the uphill side is vulnerable to any standing water backup during a heavy storm - which Queens gets regularly. |
| Stains always mean exterior roof leakage. | Interior condensation from warm air hitting an uninsulated shaft produces staining that looks identical to a water leak. Diagnosing one as the other leads to the wrong repair every time. |
Anatomy of a flat roof skylight detail that actually works
Curb height, squareness, and slope conditions
Three places decide whether a skylight behaves or tattles on the installer: the deck opening, the curb, and the membrane tie-in. Everything else - the glass unit, the hardware, the factory flashing kit - is secondary to getting those three right. That's why, as Darlene Velez, with 19 years in flat roofing and a specialty in tracking skylight leak paths, I look at the curb before I look at the glass. You can have the finest rooflight on the market sitting on a badly built curb and you'll be back on that roof inside of two winters.
I was on a roof in Ridgewood at 6:40 in the morning, still damp from overnight fog, when a homeowner met me at the hatch in her slippers to explain that her new skylight "only leaks when the rain comes sideways." That phrase - only when it comes sideways - is a direct confession from the uphill side of the curb. The installer had put down top flashing that looked clean from street level, but there was no real attention to the uphill membrane turn-up, so wind-driven rain was backing up underneath during storms. Queens low roofs are exposed. There's no parapet buffer, no tree cover, and on a block of attached rowhouses, the wind accelerates across that membrane surface like it's in a tunnel. That job is exactly why I stopped letting anyone discuss skylight installation specifications in vague terms - I want exact layers, exact heights, exact sequence, or I'm not starting.
One August afternoon in Astoria, heat bouncing off a white membrane hard enough to cook your forearms, I watched a delivery crew set a replacement rooflight on a curb that was out of square by almost half an inch. The property owner was an architect, which made the situation more complicated - he understood enough to be uneasy but not quite enough to see why those corners were a dealbreaker. An out-of-square curb corrupts the entire flat roof skylight detail: corner stress concentrates at the membrane laps, the flashing can't seat flat, and any sealant applied to bridge the gap is already working against physics from day one. We stopped the install, rebuilt the curb from the deck up, and reset everything to spec. Sealant is not a structural correction. It never was.
| Checkpoint | Acceptable Condition | Likely Failure If Missed |
|---|---|---|
| Curb Square | Diagonal measurements within ⅛ inch of each other; all corners at 90° | Corner membrane stress, flashing gaps, sealant failure within 2-3 seasons |
| Curb Height | Minimum 8 inches above the finished roof plane on all four sides | Uphill water backup during storms; membrane turn-up undermined by ponding |
| Deck Condition Around Opening | Solid, dry, no delamination or soft spots within 12 inches of curb framing | Fastener pull-through, settlement, and membrane bridging over weak deck areas |
| Membrane Turn-Up | Full contact against all four curb faces; laps sealed and adhered, not just draped | Wind-driven water infiltration at uphill face; lateral water travel under membrane |
| Corner Reinforcement | Inside and outside corners treated with approved membrane patches or pre-formed pieces before flashing | Corner splits under thermal movement; concentrated leak entry points that are hard to trace |
| Top-Side Drainage Management | Roof plane slopes or drains direct water away from all four curb faces; no saddle required unless uphill ponding is possible | Persistent uphill-side ponding accelerates membrane fatigue and forces water into any imperfect lap |
Membrane turn-up, corner treatment, and flashing sequence
⚠ Three Things Not to Trust During a Skylight Install
"We'll caulk the corners after." - Corners that aren't reinforced before flashing is set are already a leak path. Caulk applied afterward is a surface treatment on a structural gap. It will fail.
"The curb is close enough." - Close enough on curb height means the uphill side is already compromised. Any ponding during a heavy storm reaches the membrane turn-up, and from there the path is open.
"The uphill side will be fine because the flashing looks clean." - Clean-looking flashing on the top surface tells you nothing about what's happening at the membrane lap underneath it. Wind-driven water gets in from the side and from below, not just from the top.
What gets blamed on the skylight when the real problem is air and temperature
One rainy Tuesday in Forest Hills taught me something expensive - not to me, but to the co-op board that had already paid for two failed "repairs." The super called me certain the skylight glass had failed because there was staining around the shaft opening. I climbed up with a flashlight and spotted the actual problem inside ten minutes: warm interior air was escaping through gaps at the roof penetration, hitting an uninsulated shaft, and condensing on the cold curb framing. The moisture was dripping down and staining the shaft walls in a pattern that looked exactly like an exterior water leak. No water had come through the membrane. Not a drop. That's the day I started telling every customer: a rooflight detail on a flat roof system is half waterproofing and half management of how air behaves inside a building. Skip the second half and you'll be diagnosing the wrong problem indefinitely.
The difference matters for your wallet. Deck first, then curb, then membrane, now the interior shaft - that's the full sequence, and the shaft is where the air and condensation story plays out. An exterior water leak typically correlates with rain events, especially wind-driven ones, and the insulation near the curb will be wet. Interior condensation shows up in cold weather or after indoor humidity spikes, the shaft corners feel damp, and there's no clean timeline that connects the staining to when it last rained. Getting these two misread as the same problem means one of them never gets fixed. And honestly, that pattern - wrong diagnosis, repeated patches, repeat calls - is exactly what keeps some contractors busy and their customers frustrated.
Fast Diagnosis Facts for Queens Property Owners
Most-Missed Area
Uphill side of the curb - where wind-driven rain pushes under the membrane lap
Most-Misread Symptom
Shaft staining - often condensation, not a membrane breach, but gets patched as if it's a leak
Most-Overused Fake Fix
Surface sealant - masks the visible gap while the actual detailing error continues to allow water or air movement
Best Early Clue
Leaks only during wind-driven rain or temperature swings - timing alone usually identifies whether it's a water or air problem
Questions to answer before anyone touches the roof opening
If I asked you where the water actually enters, what would you point at? Most people point at the stain. Supers point at the stain. Sometimes even contractors point at the stain and start working. But the stain is a destination, not an origin - and in flat roof skylight work, the origin is almost always somewhere in the deck-to-curb-to-membrane sequence, not at the visible wet spot inside the building. Document exactly when the problem appears - sideways rain, winter cold, humid summer days - because that timing tells you which leak path you're dealing with faster than any stain location ever will. Then you can hand that information to a contractor and immediately tell whether they're asking the right follow-up questions or just sizing up the caulk job.
The stain is almost never the confession.
When a detail review is the smarter move than another patch
Here's the blunt truth from Queens roofs: repeated sealant patching around skylights is the laziest and least informative response to a recurring problem. It follows the symptom instead of the leak path, and every time it temporarily works, it delays the moment someone actually looks at the curb geometry, the membrane turn-up, and the air sealing at the shaft. Flat Masters has been doing this work in Queens long enough to recognize a two-patch job the moment we get on the roof - and the right call is a detail-focused inspection, not a third tube of sealant. If your skylight has been "fixed" more than once and water or staining keeps coming back, call Flat Masters and let's trace the actual path instead of covering it again.
If you're in Queens and a skylight issue keeps coming back despite repairs, Flat Masters is ready to look at the full detail - not just the visible symptom. Call us and let's find the actual source.
