A Roof Lantern on a Flat Roof Changes the Room Below - Here's How It's Done
Addressing the symptom is different from fixing the source. The most important part of a flat roof construction with lantern is not the glass you admire from inside the room - it's the curb height, surrounding falls, and waterproof detailing you barely see once the job is finished and the furniture is back in place.
Lantern success begins below the glass line
A roof lantern is a structural opening before it's ever a design feature. The glass gets all the attention, but the curb it sits on, the falls that move water away from it, and the waterproof transitions at its base are the parts that decide whether this project transforms the room or quietly damages it for two winters before anyone figures out why.
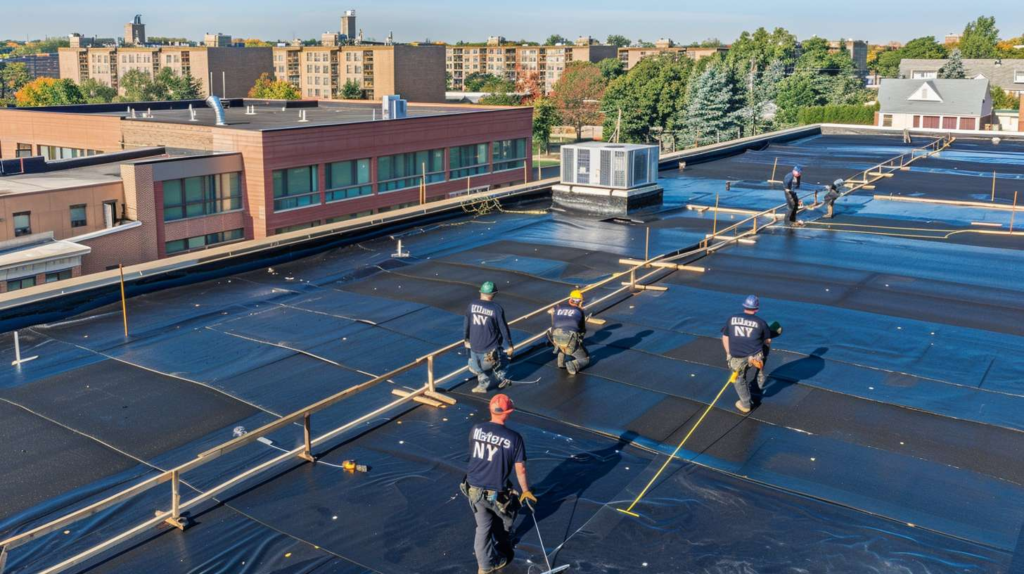
At the curb, the whole lantern either earns its keep or causes trouble. Curb height has to clear standing water and wind-driven rain. The surrounding roof surface has to fall away from the opening, not toward it. Edge detailing has to be continuous, not hopeful. And the placement of the opening within the roof field isn't decorative - it's structural and hydraulic. I'm Imani Clarke, and with 11 years guiding flat roof construction with lantern features on Queens home extensions where light and waterproofing have to work together, I've come to think of every lantern project as choreography: the light is invited in through the opening, and the water is sent away with discipline. Both have to move on your terms, or neither will.
| Element | What It Controls | What Failure Looks Like If Mishandled |
|---|---|---|
| Opening Size | How much light enters and how it distributes across the room below | Glare instead of warmth, structural compromise, or a room that feels overwhelmed rather than lifted |
| Curb Height | The lantern frame's clearance above the roof surface and standing water risk | Water infiltration at the base during heavy rain or after snow melt - the most common source of lantern leaks |
| Surrounding Falls | The direction and rate water moves away from the opening after rain | Ponding water against the curb base, accelerated membrane wear, and chronic leak points at transitions |
| Waterproof Transition | The seal between the roof membrane and the lantern curb - the most critical detail joint | Slow leaks that track internally before appearing on ceilings, often months after install |
| Frame Positioning | Structural load path, thermal performance, and whether the lantern sits level and true | Racking, seal failure at glazing bars, and drainage bias toward one end of the frame |
| Interior Daylight Effect | How the room below reads in natural light - height, warmth, shadow movement through the day | Flat, harsh overhead light with no depth, or a lantern that visually dominates rather than enhances the space |
⚠ The Most Common Mistake in Flat Roof Lantern Planning
Treating the lantern as a glass purchase first and a roof opening second. If the curb spec, surrounding falls, and waterproof transitions haven't been designed before you select a lantern product, you're choosing a frame for a hole that hasn't been properly engineered yet. The product is the last decision - not the first one.
Placement decides whether the room feels balanced or the roof starts fighting back
Size, offset, and sightline matter before the opening is cut
Before you start building a flat roof with lantern, what is the opening doing to the structure and drainage? That's the first question - not what color the frame is, not what brand of glazing. I remember a bright February morning in Forest Hills when a couple showed me magazine photos of a kitchen extension and said, "We want this exact feeling." Once I got up onto the existing roof area, I found the planned opening was too close to one edge and would have fought both structure and drainage simultaneously. We reworked the layout before a single cut was made, and that job became my favorite example of how building a flat roof with lantern isn't about dropping glass into the middle and hoping it looks expensive. The feeling they wanted came from proportions and detailing - and those had to be planned from the roof down, not the magazine up.
A roof lantern is a bit like a picture frame in the ceiling - the composition matters, but the mounting matters more. In Queens rear extensions and compact kitchen additions, this tension is real. Smaller extension footprints, which are common from Jamaica to Sunnyside, mean edge distances are tighter, drainage routes are shorter, and every inch of opening placement affects both how the room feels and how the roof performs. Push the lantern too close to a parapet and you're crowding your waterproof upstand. Shift it too far off-center and the room below reads awkward no matter how good the glass is. Local conditions matter here - Queens extensions often sit in rows where neighboring structures and shared drainage directions have to be respected before you commit to a location.
Is Your Planned Lantern Opening in the Right Place?
Design Checks Before Approving Lantern Size and Location
-
1
Room proportion: Will the lantern size feel right once furniture is in place - or will it read too large for the ceiling it sits in? -
2
Furniture below: Does the light path land where it benefits the space - over a table, a kitchen island, a reading area - rather than on a wall or a corner? -
3
Structure around the opening: Are the joists, beams, or header arrangements compatible with the planned opening without over-engineering the fix? -
4
Edge distance: Is there enough clearance from parapets, gutters, and penetrations to build a proper curb and waterproof upstand without compressing the detail? -
5
Drainage route: Does the surrounding roof surface fall away from the lantern base on all sides, or will water be directed toward the opening? -
6
Sightline from inside the extension: Standing at the main entry point of the room, does the opening frame sky - or does it clip a roofline, parapet edge, or neighboring structure?
Waterproofing fails at the base long before anyone blames the glass
I still remember rain beads sprinting toward that frame. It was a rainy June afternoon in Astoria, and I'd been called to inspect a lantern another crew had installed on a flat roof extension the previous year. The homeowner was convinced the product was defective. It wasn't. The curb height was wrong - not dramatically, but enough. The waterproofing transitions were lazy: membrane tucked rather than properly dressed, sealant doing work it was never meant to carry alone. And the surrounding falls were directing water toward the lantern base instead of away from it. The product was fine. The base was not.
Here's the blunt truth: beautiful overhead light does not excuse mediocre waterproofing. Flat roof construction with lantern details live or die at the base - at the curb joint, at the upstand, at the point where membrane meets frame. That's where water makes its decision. The glass above it is almost irrelevant to whether the room stays dry. A premium lantern product sitting on a poorly built curb with indifferent transitions will leak. A modest lantern on a correctly built base, with proper falls and a disciplined waterproof detail, will perform for decades.
My opinion? People fall in love with the view upward and forget the base downward. And honestly, I get it - the glass is what you live with every day. But the base is what you live with when it fails. Here's an insider tip worth keeping: when you're reviewing quotes for a lantern project, read for curb build spec, surrounding falls design, and waterproof transition detail. If the quote talks at length about the lantern brand, the glazing bars, and the finish color, but goes thin on those three technical items, it's describing the wrong part of the project. The part that keeps your room dry isn't the part you're being sold.
| Myth | Fact |
|---|---|
| "If it leaks, the lantern product is bad." | Most lantern leaks originate at the curb base or waterproof transition - not at the glazing or frame. The product is rarely the failure point. |
| "Any curb height is fine if it's sealed well." | Sealant is not a substitute for correct curb height. Minimum 150mm above the finished roof surface is standard - below that, standing water and wind-driven rain will find the joint. |
| "Surrounding roof falls don't matter much for a lantern." | Falls that run toward the lantern base instead of away from it create chronic ponding at the curb - which wears transitions faster and increases leak risk with every rain event. |
| "A neat frame install means the waterproofing is probably right." | A tidy-looking install can hide lazy transitions. The waterproof detail lives under the frame flange and within the upstand - not visible on the surface. It has to be built right before the frame goes on, not patched after. |
Restraint is part of the build sequence, especially when the opening starts getting bigger on paper
The right lantern is often the one that stops before it dominates the room
At the curb, the whole lantern either earns its keep or causes trouble - and that rule applies to size just as much as it applies to waterproofing. A project in Ridgewood sticks with me because the owner kept revising her dimensions upward during the framing stage. It was a warm September evening, and we stood inside the unfinished extension while sunlight through the temporary opening landed on one wall exactly where she wanted her dining table. That was the moment she understood what scale actually meant. We pulled the lantern dimensions back before the curb was finalized, and the finished room ended up balanced and genuinely beautiful - not oversized and overwhelming. Good lantern work is half roofing, half restraint. The discipline to stop before you've gone too far is part of the technical sequence, not separate from it.
Build Sequence for a Flat Roof Lantern Done Properly
-
1
Confirm room goals and sightlines so the lantern's location and scale are driven by how the space below needs to feel and function, not by what's easiest to frame. -
2
Set opening size and location with edge distance, drainage routes, and room proportion all accounted for before any structural work is committed to paper or timber. -
3
Coordinate structure around the opening - headers, trimmer joists, load paths - so the lantern sits in a frame that distributes weight cleanly and doesn't introduce movement over time. -
4
Build the curb correctly to minimum height spec, with a plumb, rigid box that the waterproof membrane and lantern frame can both bear against without deflection or movement. -
5
Create the surrounding falls and complete all waterproof transitions - membrane upstand, corner details, edge terminations - before the lantern frame is touched or lifted into position. -
6
Install the lantern and inspect every transition point under simulated water load before signing off - because the time to find a gap is before the ceiling goes in, not after the first storm.
Questions Homeowners Ask About Building a Flat Roof With Lantern
A roof lantern done right doesn't announce its technical base - it just lets the room below feel taller, warmer, and worth every disruption of the build. Call Flat Masters if you want a roof lantern built around the opening, the curb, and the water path - not just the prettiest piece of glass on the market.
